The Mount Mitchell Hike: The Highest Mountain in North Carolina
It is true, you can drive to the top of the highest mountain in North Carolina, but I guarantee you the reward of climbing Mount Mitchell is far greater! It is a tough, long day hike for sure, but with the right preparation, you can take on all 12 miles of the Mount Mitchell hike and earn your bragging rights! This guide covers everything you need to know to conquer the Mount Mitchell Trail, from the location, to the trailhead, to the summit, to the descent – a complete trail report. And bonus, not only will you check off the highest mountain in North Carolina, but also the highest peak east of the Mississippi!

Disclosure: Below are some affiliate links-these are all products I highly recommend. I won’t make any recommendations on this page that I haven’t tested or personally used! Enjoy this guide to the Mount Mitchell hike in North Carolina!
Table of Contents
Guide to the Mount Mitchell Hike in North Carolina
The Mount Mitchell hike is one of those few state high points where you can choose to hike or drive to its summit. This guide will challenge you to choose hiking Mount Mitchell! Here is what to expect if you decide to conquer the Mount Mitchell Trail with your own two feet!

Location of the Highest Mountain in North Carolina
The Mount Mitchell Trail is located in the southwestern corner of the state of North Carolina, not far from the eastern Tennessee border. It is located in Mount Mitchell State Park, surrounded by numerous small mountain towns in the beautiful Pisgah National Forest. There are plentiful quaint lodging operations and vacation rentals, such as in the town of Black Mountain, North Carolina, a personal favorite of mine. This is just one of a handful of small towns surrounding Mount Mitchell, and it was the one I choose to stay in when I hiked Mount Mitchell. It is idyllic, but know that it is about a one hour drive to the trailhead.
Or if you are needing a somewhat bigger town and more options, Asheville is the closest large town, and has plenty of character! It will be about an hour and a half drive to the Mount Mitchell Trailhead.
Since the trailhead for the Mt. Mitchell hike is located adjacent to Black Mountain Campground, there are camping options available as well for those that would like to camp at the foot of the mountain the night before (or even longer). You can reserve a site here.
Mt. Mitchell NC, and the surrounding area
Know Before You Go
FEES: Free (bring money if you want to purchase items at the summit)
Location of Trailhead: in Black Mountain Campground
Camping Available: Yes
Dogs Allowed: Yes
Parking: Designated parking lot across from campground
Bathroom/Water: Available in campground adjacent to trailhead
Cell Service: Somewhat spotty
The trailhead of the Mount Mitchell hike is actually located in the Black Mountain Campground. The drive into the campground and trailhead is pretty remote, though you will oddly enough pass by a small cluster neighborhood of nice homes, a country club, and golf course, minutes before arriving at the trailhead. You will also pass along the fabled Blue Ridge Parkway, so another bonus there! Google Maps and/or AllTrails will lead you to the campground and/or trailhead, but be sure to be familiar with the route and start your navigation before getting close to the trailhead, as service got spotty for me.
The trailhead for the Mount Mitchell hike is located inside the Black Mountain Campground, but the parking lot for Mount Mitchell hikers is actually right across the street from the entrance to the campground. Before entering the campground, the decently sized parking lot will be on your left. Park, and then cross the street, cross over the small bridge over the stream, and the trailhead will be just to the left, across from the campground office. It is marked with a sign.
You do not need to pay to park, or enter the campground, or hike the Mount Mitchell Trail. There are bathroom facilities available at the campground office right across from the trailhead. It is also a good place to fill up on all the water you will need.
As I mentioned earlier, if you want the closest lodging possible to the trailhead, you can camp in the Black Mountain Campground, which can be reserved here.


Quick Facts on the Mount Mitchell Hike
Length: 12 miles roundtrip out and back
Elevation: 6,684 feet
Elevation Gain: 3,694 feet

Rating: Difficult – significant and consistent elevation gain that rarely lets up
Dog Friendly: Yes, but only if your dog has experience with long distance and uphill climbs! This is a long and difficult uphill hike, do not sign your dog up for more than they are already acclimated to!
Estimated Time to Complete: 4-6 hours
Best Time to Hike: Summer (early in the morning), Fall, and Spring (there can be somewhat dicey winter conditions occasionally due to the elevation)
Full Trail Report on the Mount Mitchell Hike
Once you have started out from the campground area and then on the trailhead, the first thing you will notice is an initial jaunt that parallels the stream, and follows a brief railing. This is the first part of the Mount Mitchell hike. The path will cross one of the park roads, and then you will be getting into the heart of climbing Mount Mitchell. Also be on the lookout for the blue blazes, which will start here, and will be plastered along trees for the entirety of the hike. This trail is well marked and well maintained, with signage every half mile and easy to follow regardless, but the blue blazes are very helpful. If in doubt, look for the blue blazes! And the signs posted every half mile will tell you the distance covered, so that is helpful for pacing purposes.


At this point after the trailhead and crossing the park road, you will start to notice slightly more dicey terrain. Other reviews I read stated that the roots and rocks were extremely challenging, but I personally found them to be only moderate. There definitely are a healthy amount of roots and small to medium sized rocks to watch your footing for, but largely they did not interfere heavily with foot placement for me.
I have seen much more challenging rock conditions, such as the 16 mile long Mount Marcy hike, (another one of the 50 state high points in the US) which is basically rock hopping in a wet ravine all the way to the highest point in New York! Mount Mitchell is not near as bad, and the trail conditions for my hike were mostly dry, with a few exceptions near the top when the ground began to collect a little moisture, likely from the fog that was hanging around at the higher elevation.
For descent purposes, keep in mind that the rocks and roots present on the Mount Mitchell Trail will slow your descent, as it took me almost the same amount of time to ascend as descend due to needing to be a little more mindful of foot placement coming down. Total elapsed time on this hike was 6 hours, including breaks and summit time.
Mount Mitchell is an uphill climb, the whole time. I read this previously, and can report that this is pretty much literally true. There really are no breaks in the steady incline, save for a handful of 30 second stints of flatness. This day hike contains a very challenging amount of elevation gain at just shy of 4,000 feet of gain, but keep in mind that it is spread out over 6 uphill miles, so that does help with the grade. Just watch your pacing, and watch your breathing. Start early, and give yourself plenty of time to hike.
Compared to other hefty, uphill day hikes, and other challengingly graded uphill state high points hikes I have completed, like Colorado’s Mount Elbert, or Utah’s high point Kings Peak, both similar in elevation gain, I found the Mount Mitchell hike to be comparatively easier, and probably mostly due to the incline being more spread out over more mileage. It is a toss up for what you prefer – a shorter hike with a more challenging grade, or a longer hike with a slightly less steep uphill. For me, the Mount Mitchell Trail is the latter, but not to be under-estimated.
One other factor that some may find helpful is the heavily shaded nature of the Mount Mitchell hike. From the moment you start on the trailhead, to just before you break tree cover at the summit, this trail is shaded. I personally appreciated that, as the sun beating down or strong winds were not environmental factors I had to take into account for climbing Mount Mitchell. On the flip side, though, that does mean that there aren’t many truly impressive panoramas along the way to the summit.

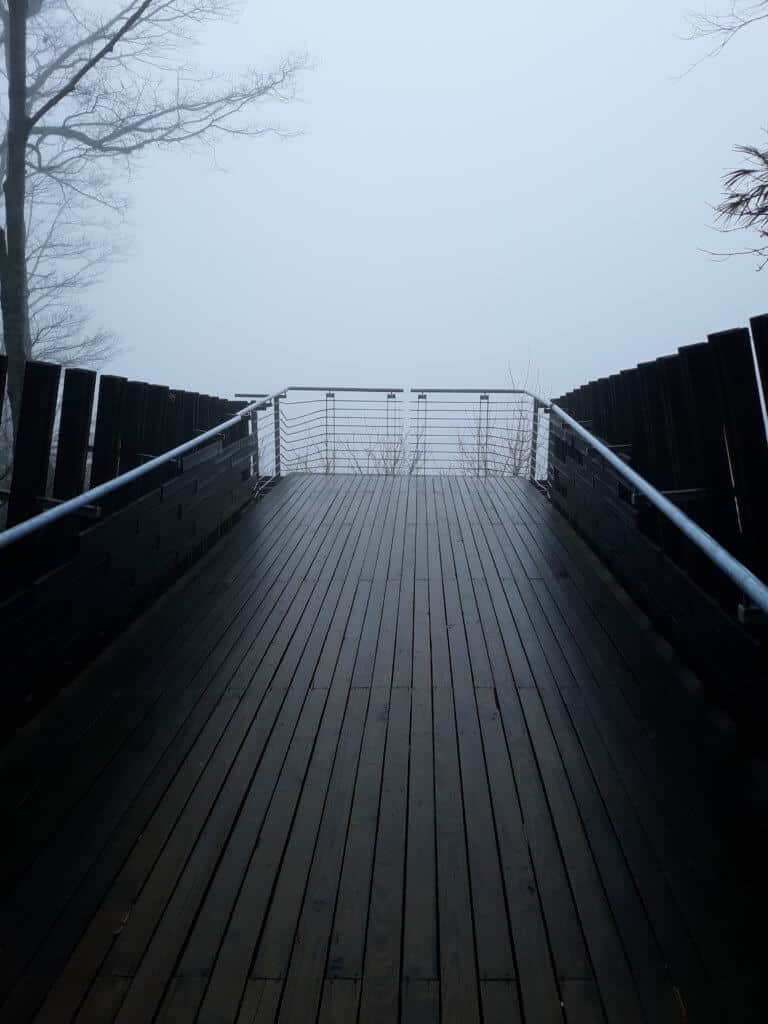
 A brief break in the canopy
You will pass about 3 real breaks in the canopy on the way to the top of the highest mountain in North Carolina, but keep in mind that the best payoffs and views really will be from the summit!
To tackle the 12 miles of the Mount Mitchell hike, mental preparation and perseverance are important, as well as careful pacing and not burning yourself out too quickly. There are a handful of slightly more difficult uphill sections, particularly around mile 3, but in general it is just a long, consistently uphill, day hike.
When my husband and I hiked Mount Mitchell, we made it to the top in 3 hours, but that was after a lot of intense trail running prep and hiking training exercises, and without taking breaks on the way up. We did take a break at the summit, though it was a short one as the fog was rolling in, lending to somewhat wet and cold conditions. We did find that it took almost as long to descend, due to the rocks and roots present on trail, and the need for more mindful foot placement.
The Mount Mitchell Summit
Just prior to reaching the summit of the highest mountain in North Carolina, you may start to notice slight changes to the forest. It shifts ever so slightly to incorporate some of those more alpine characteristics, and becomes more mossy and mystical. One of my favorite parts of the hike.


Also, if the weather is similar to the day that we hiked, you will be able to feel the cooler air and fog beginning to creep in at the higher elevation. This is a good spot to break out a lightweight shell jacket possibly, like my all time favorite Outdoor Research Helium II jacket, especially if you have worked up a sweat getting to this point. Even in the summer, you can get a chill here at the top.
Just before reaching the summit, you will pass the Balsam Nature Trail. This is a great option for getting a taste of Mount Mitchell, for those that do choose to drive to the summit, but still want to do a little exploring. You can access the Balsam Nature Trail from the summit. Continuing on, you will reach a break in the canopy, which indicates the end of the Mount Mitchell Trail, and the beginning of the short, paved walkway to the summit viewing platform. Ironically, this short, paved walk is probably among one of the steeper portions of the whole hike!
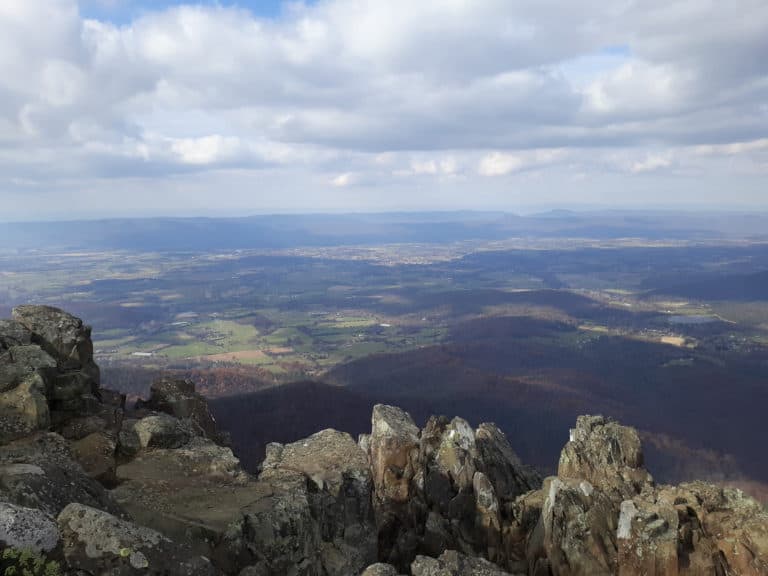
The summit of Mount Mitchell really embraces its identity as the highest mountain in North Carolina, and the highest point east of the Mississippi! The viewing platform erected is circular and suspended (very similar to the viewing platform found at the high point of Tennessee, Clingman’s Dome), providing uninterrupted and 360 views, as if floating amongst the treetops! Definitely a worthy reward for 6 miles of uphill work!

 Views from the platform at the highest mountain in North Carolina
 Markers on the summit viewing platform
Normally there are some facilities, a gift shop, and food sold at the cafe on top, but at the time of my hike these were closed due to COVID. They have since reopened (so bring some money if you plan to purchase anything at the summit).
Again, even in the summer there is a chance that it will be chilly at the top, so come prepared. After taking in the sights and experience, proceed to descend down the Mount Mitchell Trail the same way you came up. I promise by the end of the 6 miles of descent your mind and your feet and your knees will be playing mental and physical warfare with you, but overcoming this very challenging day hike is worth it! Take a snack break on the way down, stop for pictures, and get creative in finding some other ways to break up the hike and keep from burning out! The descent is also a good time to break out the trekking poles if you knees need a little extra support at this point.
Gear Recommendations for Hiking Mount Mitchell
There are definitely a few necessary items I would recommend taking along on a day hike of this magnitude:
Water Transportation System! There are a few trickling stream crossings and small pools along the Mount Mitchell Trail, but you’d be much better off bringing all the water you need on you in advance. And keep in mind this is a 12 mile hike, so you may need to bring more than you think you may need. I would recommend no less than 3 liters a person. You can accomplish this several ways, but I went with using my Camelbak hydration vest, and accompanying Platypus hydration bladder, and two handheld water canteens that I stashed in the pockets of my hydration vest, which gave me a little over 3 total liters of water. I really love this Camelbak hydration vest, because it incorporates a little bit of my trail running background with day hiking. It gives me the water transportation and storage that I need, but its flush and secure design means that if I do break out into a little jog, there is no bouncing! Also, this particular Platypus hydration bladder has a wide mouth, so it is easy to clean and dry, and helps me maintain on the go hydration. The storage pockets are perfect for day hikes, with enough room for two additional small canteen style water bottles, items like keys, phones, snacks, and Chapstick, and even room to bring along an extra pair of socks, a lightweight jacket, and even items like an emergency bivvy. You can also go with a day hiking backpack, like the Camelbak Helena daypack I use for many of my day hikes. It has more storage available, and is hydration bladder compatible. Both of these are great options for the Mount Mitchell hike!
Shoes! I would make a strong argument for trail runners on this hike! I much prefer trail runners on long day hikes, because they are lighter weight, have great cushioning, and just help my feet feel “fresher” by the end of a long hike. The grade of the incline here definitely falls within a range I would consider reasonable for trail runners. The steepness is not significant enough to warrant a hiking boot, and trail runners, like the Hoka Speedgoats I use, are perfect! Nothing beats the cushioning on these trail runners, and the superb grip handled all of the roots and rocks without question!
Socks! I always say that your shoes are only as good as your socks when it comes to hiking! Nothing can derail a hike quicker than blisters! I used to be very blister prone on long runs and long hikes, until I discovered Hilly Twin Skin socks and they saved my feet! These socks have a liner and work phenomenally against blister prevention, they were a lifesaver for me and I’ve had zero blisters since I started using them for my trail runs and long day hikes!
Trekking Poles! I would recommend trekking poles on this hike, if you have them. The grade and somewhat unpredictable terrain can be more easily handled with a pair of trusty trekking poles, like these Black Diamond poles that I use. Easy to set up, reliable to use, knee savers on downhills, and I really love the cork handles, which prevent slippage due to sweaty hands, which is a problem on other “plasticy, rubbery” type handles.
A lightweight, outer shell! Of course, depending on the weather and season, your layers may look differently, and you will need to layer appropriately accordingly for your given environmental factors. And of course, whatever you do, AVOID COTTON! Wear layers that are breathable, moisture wicking, and quick drying, like wool! Regardless of whether it’s a crisp fall day or a hot summer one, one thing that will come in handy is a lightweight, waterproof shell. Because even in summer, the top of Mount Mitchell is often going to be much cooler than its base. Couple that with the weather patterns often found at the summits of many peaks, and you may encounter some foggy, drizzly, rainy, or cold conditions for the last part of your hike up. You do not want to break a sweat hiking up, only to catch a chill at the top. The most lightweight and still fully waterproof jacket out there is the Outdoor Research Helium II jacket. Weighs just a couple ounces, highly compressible, and can easily fit in even a smaller hydration vest where storage is more limited.
***Whenever you are day hiking, especially a longer hike like Mount Mitchell, be sure to have a complete inventory of all day hiking essentials! Not sure what makes up the 10 categories of day hiking essentials?
Find out here with this complete day hiking gear essentials CHECKLIST!
How to Train to Hike Mount Mitchell
It is no easy feat to hike 12 miles in one day, especially when 6 of those miles are a steady incline of almost 4,000 feet! So where do you start with training?
I live in north Texas, where the elevation is low, the terrain is mostly flat, and the seasons have uncooperative months! And I am telling you that training for uphill climbing, even in those conditions, can be done! Here are a few quick tips for starting a training regimen for Mt. Mitchell!
- No matter where you live, find elevation where you can – for me, that means doing loops on my local multi use trail until I reach a couple thousand feet of elevation gain. Not the most glamorous, and it has it’s monotonous moments, but it takes creativity. And podcasts! If you don’t happen to live in a state like Colorado, you can utilize this strategy, plus find other forms of elevation gain to mix in, like taking stairs where you can, find a stadium to stadium stair run, walking or running paved hills, or doing these 6 at home hiking exercises that target the muscles you need for uphill climbing! Did I mention you can do these at home!!!
- Cross train! – This is extremely helpful for full body strengthening, especially for getting all your muscle systems working together harmoniously. Cross training can look like cycling, running, trail running, kayaking, Pilates, yoga, or at home HIIT routines!
- Follow a training calendar! – For all my challenging, long distance day hikes, like the Grand Canyon’s 24 mile Rim to Rim hike, or California’s 21 mile Mount Whitney, I train months in advance using a proven hiking training calendar. You can find an example of my own long distance hiking training plan here!
- Proper nutrition and hydration goes a long way to performance during training and on your big hike day! Need help staying on top of nutrition and hydration? Check out these helpful trackers I developed for meal prepping and hydration tracking! And don’t forget snacks! Check out these best day hiking snacks, and then grab them all with this helpful checklist!
- For more helpful tips on how to prepare for challenging, long distance day hikes, like Mount Mitchell and others, check out these proven resources that I have executed on grueling hikes like the Grand Canyon’s 24 mile long Rim to Rim hike, the Rim to River hike, Colorado’s highest 14’er Mount Elbert, and California’s 21 mile long Mount Whitney (the highest point in the lower 48 states).
- 16 Week Rim to Rim Training Calendar
- 16 Week Mt. Whitney Training Calendar
- Customizable HIIT Home Workout Routine
- Long Distance Hiking Training Plan
- 6 Hiking Exercises You Can Do From Anywhere
And now you are ready for hiking Mount Mitchell, the highest mountain in North Carolina!!!

*This was state high point hike #40 out of 50 for me! If you are curious about “highpointing” the 50 U.S. states, this state high points post is a great introduction!
**You can also grab a free U.S. state high points download here!
Interested in Mt. Mitchell’s neighboring high point hikes? Be sure to check out:
- Virginia’s Mt. Rogers hike (one of my top 3 favorite hikes!)
- Tennessee’s Clingman’s Dome (the trifecta of the highest point in Tennessee, on the Appalachian Trail, and in the Smoky Mountains!)
- Georgia’s Brasstown Bald (a short and sweet high point hike with one of the prettiest viewing platforms!)
Check off these and more from your highpoint adventures with this State High Point Hikes Checklist!
PIN for LATER!