How to Hike Rim to River in Grand Canyon National Park
One of the most epic hikes in the United States is the Grand Canyon Rim to River hike, also known as hiking Rim to River to Rim. Few people get to revel in the breathtaking views of the Grand Canyon from both above and below, but if you choose to take on a Rim to River hike, you will experience just that, and it is an unforgettable experience! In this guide, you will find everything you need to successfully hike the Grand Canyon Rim to River, including a full trail report, terminology, park info, logistics, gear recommendations, and safety precautions.

Disclosure: Below are some affiliate links-these are all products I highly recommend. I won’t make any recommendations on this page that I haven’t tested or personally used! Enjoy this guide to completing a Rim to River hike in Grand Canyon!
Table of Contents
How to Hike Rim to River in Grand Canyon National Park
This post will walk you step by step through preparing for and executing a Rim to River hike in Grand Canyon National Park, in ONE day!

What’s Included in this Rim to River Guide?
This guide to the Grand Canyon Rim to River hike includes the following information:
- Overview of the Inner Corridor Trails in Grand Canyon National Park
- Recommended Route for a Rim to River hike
- Rim to River Logistics and Terminology
- Full Trail Reports of Rim to River Trails (South Kaibab and Bright Angel)
- Gear Recommendations
- Safety Precautions and Hiking Tips
- Training for the Rim to River

What is a Rim to River Hike?
A Rim to River hike is basically what the name implies. Hiking from the rim to the river and then back up to the top of the rim. A Rim to River hike is also commonly referred to as a Rim to River to Rim hike for that reason. But what rim are we talking about, and what river?
Technically, there are several ways you can hike a Rim to River. There are 3 inner corridor trails in Grand Canyon National Park, and all of them meet at the bottom at the Colorado River.
- The North Kaibab Trail (North Rim)
- The South Kaibab Trail (South Rim)
- The Bright Angel Trail (South Rim)
The images below shows how all 3 of these corridor trails meet at the bottom of the canyon at the Colorado River.


Based on these images, you can see how it is possible to hike from “a rim to the river and back to the rim” at least 3 different ways. And that is true.
- You could hike the North Kaibab Trail from the North Rim to the bottom, then back up again.
- You could hike the South Kaibab Trail from the South Rim to the bottom, then back up again.
- You could hike the Bright Angel Trail from the South Rim to the bottom, then back up again.
*HOWEVER, a typical Rim to River hike in the Grand Canyon is actually a COMBINATION of hiking the South Rim corridor trails. Keep reading for the recommended way to combine hiking the South Rim trails for a standard Rim to River hike.
Why not a Rim to River from the North Rim? Because the North Kaibab Trail is 28 miles long roundtrip, which would make for a extremely challenging day hike if you hiked from the North Rim to the river back to the North Rim.
*IF you plan to do a Rim to River on just one individual trail, it’s best to choose from the two South Rim corridor trails: the South Kaibab Trail or the Bright Angel Trail.
- South Kaibab to River to South Kaibab: 14 miles roundtrip
- Bright Angel to River to Bright Angel: 19 miles roundtrip
While the two options above are both doable, they are still not the most RECOMMENDED way to hike a Rim to River in the Grand Canyon. The most common and recommended way to complete a Rim to River hike is to hike down the South Kaibab Trail to the Colorado River, then up the Bright Angel Trail.

The BEST Way to Hike a Rim to River in Grand Canyon National Park
By far the most common and recommended way to complete a Grand Canyon Rim to River hike is to descend the South Kaibab Trail to the Colorado River (where Bright Angel Campground and Phantom Ranch are located), and then ascend the Bright Angel Trail. This guide will go into depth on exactly WHY this is the recommended route, as well as prepare you for the planning and training portions of this hike.

Quick Facts on a Rim to River hike via the South Kaibab Trail and Bright Angel Trails
- Length: 16.5 miles roundtrip (or 17.5 miles roundtrip if you go all the way to Phantom Ranch)
- Highest Elevation: 7,200 feet
- Lowest Elevation: 2,500 feet
- Elevation Gain: 4,400 feet
- Rating: Very Difficult
- Dog Friendly: NO
- Fees and Permits: There is a $35 entrance fee into the South Rim entrance of Grand Canyon National Park. It is good for 7 consecutive days (so you can come back and leisurely visit the park again after you finish hiking!). No permit is required to day hike Rim to River in Grand Canyon in ONE DAY. A permit/reservation is only required if you are trying to camp at one of the campgrounds. (This post only addresses day hiking Rim to River).


Why South Kaibab and Bright Angel Trails?
Because you get the best of both worlds. Completing a Rim to River by descending the South Kaibab Trail and ascending the Bright Angel Trail takes advantage of the best of both of these trails, while avoiding the cons of these two trails. You get to experience TWO unique and different corridor trails on the same hike.
So while it is possible to do a Rim to River by hiking down and up South Kaibab alone, or down and up Bright Angel alone, the best way to get the most out of your Grand Canyon experience is to combine them this way: descend South Kaibab and ascend Bright Angel.
The advantages of descending South Kaibab:
- Avoid the exposure and warmer temperatures of the later part of the day
- Less worry about no water on the trail
- The best corridor views = the best sunrises! Really and truly, South Kaibab has the best views of all 3 inner corridor trails!
The advantages of ascending Bright Angel:
- More shade and less exposure for the climb up during the later part of the day
- Several water fill stations on the trail
- Well trafficked = lots of morale, support, or help from others if needed for the hardest part of the hike
- Finish near amenities – close to lodging, food, showers, etc., as soon as you are finished!
*Why not the other way around (descend Bright Angel and ascend South Kaibab?)
South Kaibab has no water (between the trailhead and Bright Angel Campground at the bottom) and is very exposed, so if you are hiking in the warmer months (May – October), finishing on South Kaibab would mean ascending a fully exposed trail, with no water, during the second part of the hike and later in the day, with hotter temperatures. Plus, South Kaibab is slightly steeper than Bright Angel, and is a bit tougher to climb out. It can be a brutal and even lethal combination. For those reason, it is largely recommended to descend South Kaibab (earlier in the day = cooler temps and less reliance on water) and ascend Bright Angel, which has multiple water refill stations and more shade. Of course, some caveats to this would be if you were hiking in the colder months, or hiking at night. In those situations, ascending South Kaibab would be less of a concern.
Planning Your Rim to River Hike
The first thing to tackle is understanding the logistics of a Rim to River hike. The good news is, hiking down and up just the South Rim is FAR less complicated than a full Rim to Rim hike, which spans one rim to the other (North to South or South to North). On a Rim to River hike, you get to start and finish on the same rim, but there are still some logistics to take care of prior.
- Accessing the South Kaibab Trailhead
- Securing Lodging
Accessing The South Kaibab Trail
Arguably the biggest logistical hurdle involved in a Rim to River hike is accessing the South Kaibab Trailhead. You cannot access the South Kaibab Trailhead by personal vehicle, or park a personal car there. The South Kaibab Trailhead, and it is only accessible by park shuttle, taxi, or walking. To clarify, you can be dropped off at the access gate to the South Kaibab Trailhead, but then it’s about a 3/4ths mile walk to the actual trailhead.
3 Ways to Access the South Kaibab Trailhead:
- free park shuttle from Grand Canyon Village (only runs at certain times)
- taxi (picks up from anywhere in Grand Canyon Village or Tusayan)
- drop off / walk (can get dropped off and walk ~ 3/4ths mile to the trailhead, or walk from Grand Canyon Village which is ~ 4 miles)
If you plan to take the park shuttle from Grand Canyon Village, know that they only run at certain times. Make sure you check the schedule beforehand. You will want to park at Grand Canyon Village (Backcountry Information Lot by Maswik Lodge is the best spot), and then take the free park shuttle from Grand Canyon Village to the South Kaibab Trailhead. You cannot park at the South Kaibab Trailhead, it is only accessible by park shuttle, taxi, or walking.
There are two shuttle options, and they run on different schedules depending on season, so be sure to check the park website for specific details in order to plan your arrival and start time. You will want to take either the hiker’s shuttle or the orange line from Grand Canyon Village to the South Kaibab Trailhead. Both park shuttles are FREE. The schedules also vary depending on season. Below you can access the National Park website for more details, as well as view summaries of routes and schedules.
Visit the NPS Website for Details on Shuttle Lines and Schedules

If you don’t like the hassle or times of the park shuttle, the taxi might be the option for you. Note that you cannot make reservations and there may be a wait time, but the taxi will pick up from anywhere in Tusayan or Grand Canyon Village and drop off right at the South Kaibab Trailhead. And there’s no paying an entrance fee when you take the taxi.
- Grand Canyon Taxi: 928-638-2822
- Xanterra Taxi: 928-638-2631
And finally, you can walk. If you get dropped off at the gate, it’s about a 3/4ths mile walk to the trailhead. You can also walk from Grand Canyon Village. It’s about 4 miles.
Because you cannot leave a vehicle at the South Kaibab Trailhead, the most common thing to do is leave a parked car at Grand Canyon Village (by the Bright Angel Trailhead), so that it’s there waiting for you at the finish. Or get picked up by somebody. In order to achieve this, common logistics include:
- Having a family or friend drop off at the South Kaibab Trailhead and pick up later at the Bright Angel Trailhead
- Park your car near Bright Angel Trailhead and then shuttle or taxi over to the South Kaibab Trailhead
- Park your car near Bright Angel Trailhead and walk over to the South Kaibab Trailhead (~ 4 miles)
- Stay in Tusayan and take the taxi to the South Kaibab Trailhead and again from the Bright Angel Trailhead back to Tusayan.
If you are planning to park a car near the Bright Angel Trailhead before starting your Rim to River hike (so that it’s there waiting for you at the finish), you can find helpful info on where to park for the Bright Angel Trailhead below:

The simple answer though is: the Backcountry Information Lot near Maswik Lodge is recommended! It will also pop up on Google Maps for you if you put that in. It’s about a 5-10 minute walk between the Backcountry Information Lot and the Bright Angel Trailhead.
Lodging for a Rim to River Hike
Lodging on the South Rim can fill up quickly, so you’ll want to make your reservations as early as possible, especially on peak weekends. The good news is that, you have a couple options. There are the National Park campgrounds, the National Park lodges located directly on the South Rim, and additional hotels and rentals available in nearby Tusayan (about 5 minutes from the South gate). You can check out these handful of additional Tusayan hotels and rentals here.
I personally enjoy staying in Tusayan because it is so close, but still budget friendly. Plus, the taxi will pick up and drop off in Tusayan, so you can take the taxi from your hotel in Tusayan straight to the South Kaibab Trailhead, if you go that route. Here’s that info again:
- Grand Canyon Taxi: 928-638-2822
- Xanterra Taxi: 928-638-2631
Because the South Rim is also closer to more cities, it’s also realistic to stay in one of the other nearby towns, both before or after your Rim to River hike.
Closest Cities:
- Tusayan, AZ to South Rim: 10 minutes
- Williams, AZ to South Rim: 1 hour
- Flagstaff, AZ to South Rim: 1 hour and 30 minutes
It is doable to book lodging in Flagstaff or Williams, if necessary based on availability, and arrive early for your hike, though it is more recommended to stay either directly on the South Rim or in Tusayan, ideally the night before and the night after your hike (so you don’t have to worry if your hike takes longer than you anticipate). Lots of people enjoy having lodging close by the night before and after the Rim to River hike, which is why the South Rim lodges and Tusayan are popular. I myself tend to agree, because you never know if you might have a late night getting out of the canyon, and it is nice not having to worry about driving far.
For planning purposes, here is a list also of the closest airports to the South Rim:
Closest Airport(s):
- Grand Canyon Airport (Grand Canyon National Park)
- Flagstaff Pulliam (Flagstaff)
- Phoenix Sky Harbor International Airport (Phoenix)

How Long Does it Take to Hike Rim to River?
Before we get into the actual trail reports for a Rim to River hike, there’s one more common logistical question that is typically asked, that is helpful to know for planning purposes. How long does it take to hike a Rim to River?
There’s no hard and fast number, but between 8 -12 hours is an approximate average to hike a Rim to River via South Kaibab and Bright Angel. This includes whether you plan to add on an extra mile to go to Phantom Ranch at the bottom, plus breaks for bathrooms, snacks, etc. It is also natural to plan on going slower on the ascent up Bright Angel and the South Rim. Descending the South Kaibab Trail may not be as quick as you would think either, as the steep trail can wreak havoc on knees and legs if you don’t pace yourself carefully.
The best way to anticipate how long it will take YOU to hike a Rim to River, is to find out during training hikes. This is not a hike you undertake without training and preparation. You should complete several long distance day hikes prior to a Rim to River hike, with your longest being in the range of 14 or 15 miles, so that will help you gauge your approximate finishing time according to previous long distance day hikes. Just know that the last several miles can be unpredictable, and even the fittest hikers slow to a pace that surprises even them.
*If you want a more in depth look at training for a Rim to River, you can take a look at this article dedicated entirely to training for a Rim to Rim hike. While this detailed training plan is for hiking the full Rim to Rim, the concepts still completely apply to hiking a Rim to River. This training plan also includes the chance to get a FREE training calendar, which can help you in planning the foundation of your own Rim to River training plan.
You will see later in this post a complete list of recommended gear for a Rim to River hike, but now is a good time to mention that bringing a headlamp is a good suggestion, in case your hike takes longer than anticipated. The South Rim will start to get dark around 6 pm in October, and be fully dark around 6:30 pm.

When is the Best Time to for the Rim to River hike?
Another logistical question is when to hike a Rim to River?
While the North Rim of Grand Canyon National Park closes between May 15th – October 15th, the South Rim is open daily year round. So you can hike a Rim to River all year long. That being said, shoulder seasons are the best time to complete a Rim to River hike in Grand Canyon. Late October or early November. Or late April / early May. Temperatures will likely still be moderate. I would not recommend the summer months, because the temperatures can simply be too deadly. If you do hike in summer, you will want to get a very early start, like 2 or 3 am.
In winter, you may be contending with conditions like sleet, snow, ice, and freezing temperatures, which can be contended with, but are going to take more preparations and specialized gear such as microspikes and the right layers. So spring and fall are the more straightforward better seasons to hike.
My personal favorite time to hike in the Grand Canyon is mid to late October, or early November. It may likely still be a bit hot at the bottom in the afternoons, but it shouldn’t be life-threatening or miserable. Early morning starts can help to mitigate this as well as needed. Morning and evening will likely be quite pleasant temperatures.
Safety Precautions and Tips for Hiking Rim to River
Before you get started on your Rim to River, you should know there are some pretty serious safety tips to be aware of. The National Park Service doesn’t mess around with warning hikers about the Rim to River hike. There are graphic, grim warning signs about the potentially fatal characteristics of this hike posted around the South Rim, most notably just after both the South Kaibab and Bright Angel Trailheads. The NPS basically even goes so far as to advise that hikers not attempt the Rim to River. So it should go without saying that this is a very serious undertaking. It is not something you should just “wing” on a whim. The Rim to River hike takes months of preparation, training, and dedication. So before attempting, be sure you are ready to make that kind of commitment, for your own safety’s sake. As they say in the Grand Canyon, you have to be able to get yourself out. Going down is optional, coming up is mandatory.
Before hiking, make sure you are well versed with:
- the potential heat in the Grand Canyon (always check the forecast)
- the challenge of the inner corridor trails – be very familiar with the trail profiles
- your own physical abilities – be physically prepared
- your training plan (you can follow a gradual training plan like the one found in this article)
- the right gear – includes proper day hiking gear for the Grand Canyon, plus plenty of water and good hiking snacks
Hiking in the Grand Canyon itself can be cruelly misleading at times, and that is important to keep in mind. After all, how could somewhere so packed with tourists and families and kids, also be so potentially deadly. Throngs of people descend down Bright Angel Trail everyday, so why is it such a big deal?


Hiking Rim to River is deceptive largely because the hardest part comes at the end. It is so easy to cruise down the South Kaibab Trail in the early morning sun and cool temps at the top, and still feel great when hitting the Colorado River. Then all of a sudden, the temperatures escalate, and instead of being bathed in gentle morning sunlight, you are crushed by simmering temperatures that can easily climb over 100. And there are large portions of the Rim to River hike with very little shade. Most hikers agree that the hottest part of a Rim to River hike is the portion between Phantom Ranch/Bright Angel Campground and Havasupai Garden Campground, about 5 miles in length. This includes the exposed switchbacks on the Devils Corkscrew.
And don’t forget, there’s the almost 5,000 feet of elevation gain that comes at the end of the hike, after your legs are dead tired, after your body is drained from the sun and heat, and after your energy stores are near empty. Can you see why the NPS takes its warning so seriously now?
Grand Canyon National Park may be one of the most visited National Parks by tourists of every kind, but venturing down into the canyon, to any degree, is stepping into a different world than one sees from the rims. It is crucial to know this and prepare accordingly. Unfortunately, people die every year attempting to hike rim to river in Grand Canyon. This is why I have an entire post dedicated to properly training for a Grand Canyon hike!
Not that this training plan above is for a full Rim to Rim, but it absolutely applies to training for a Rim to River!

Rim to River Trail Report
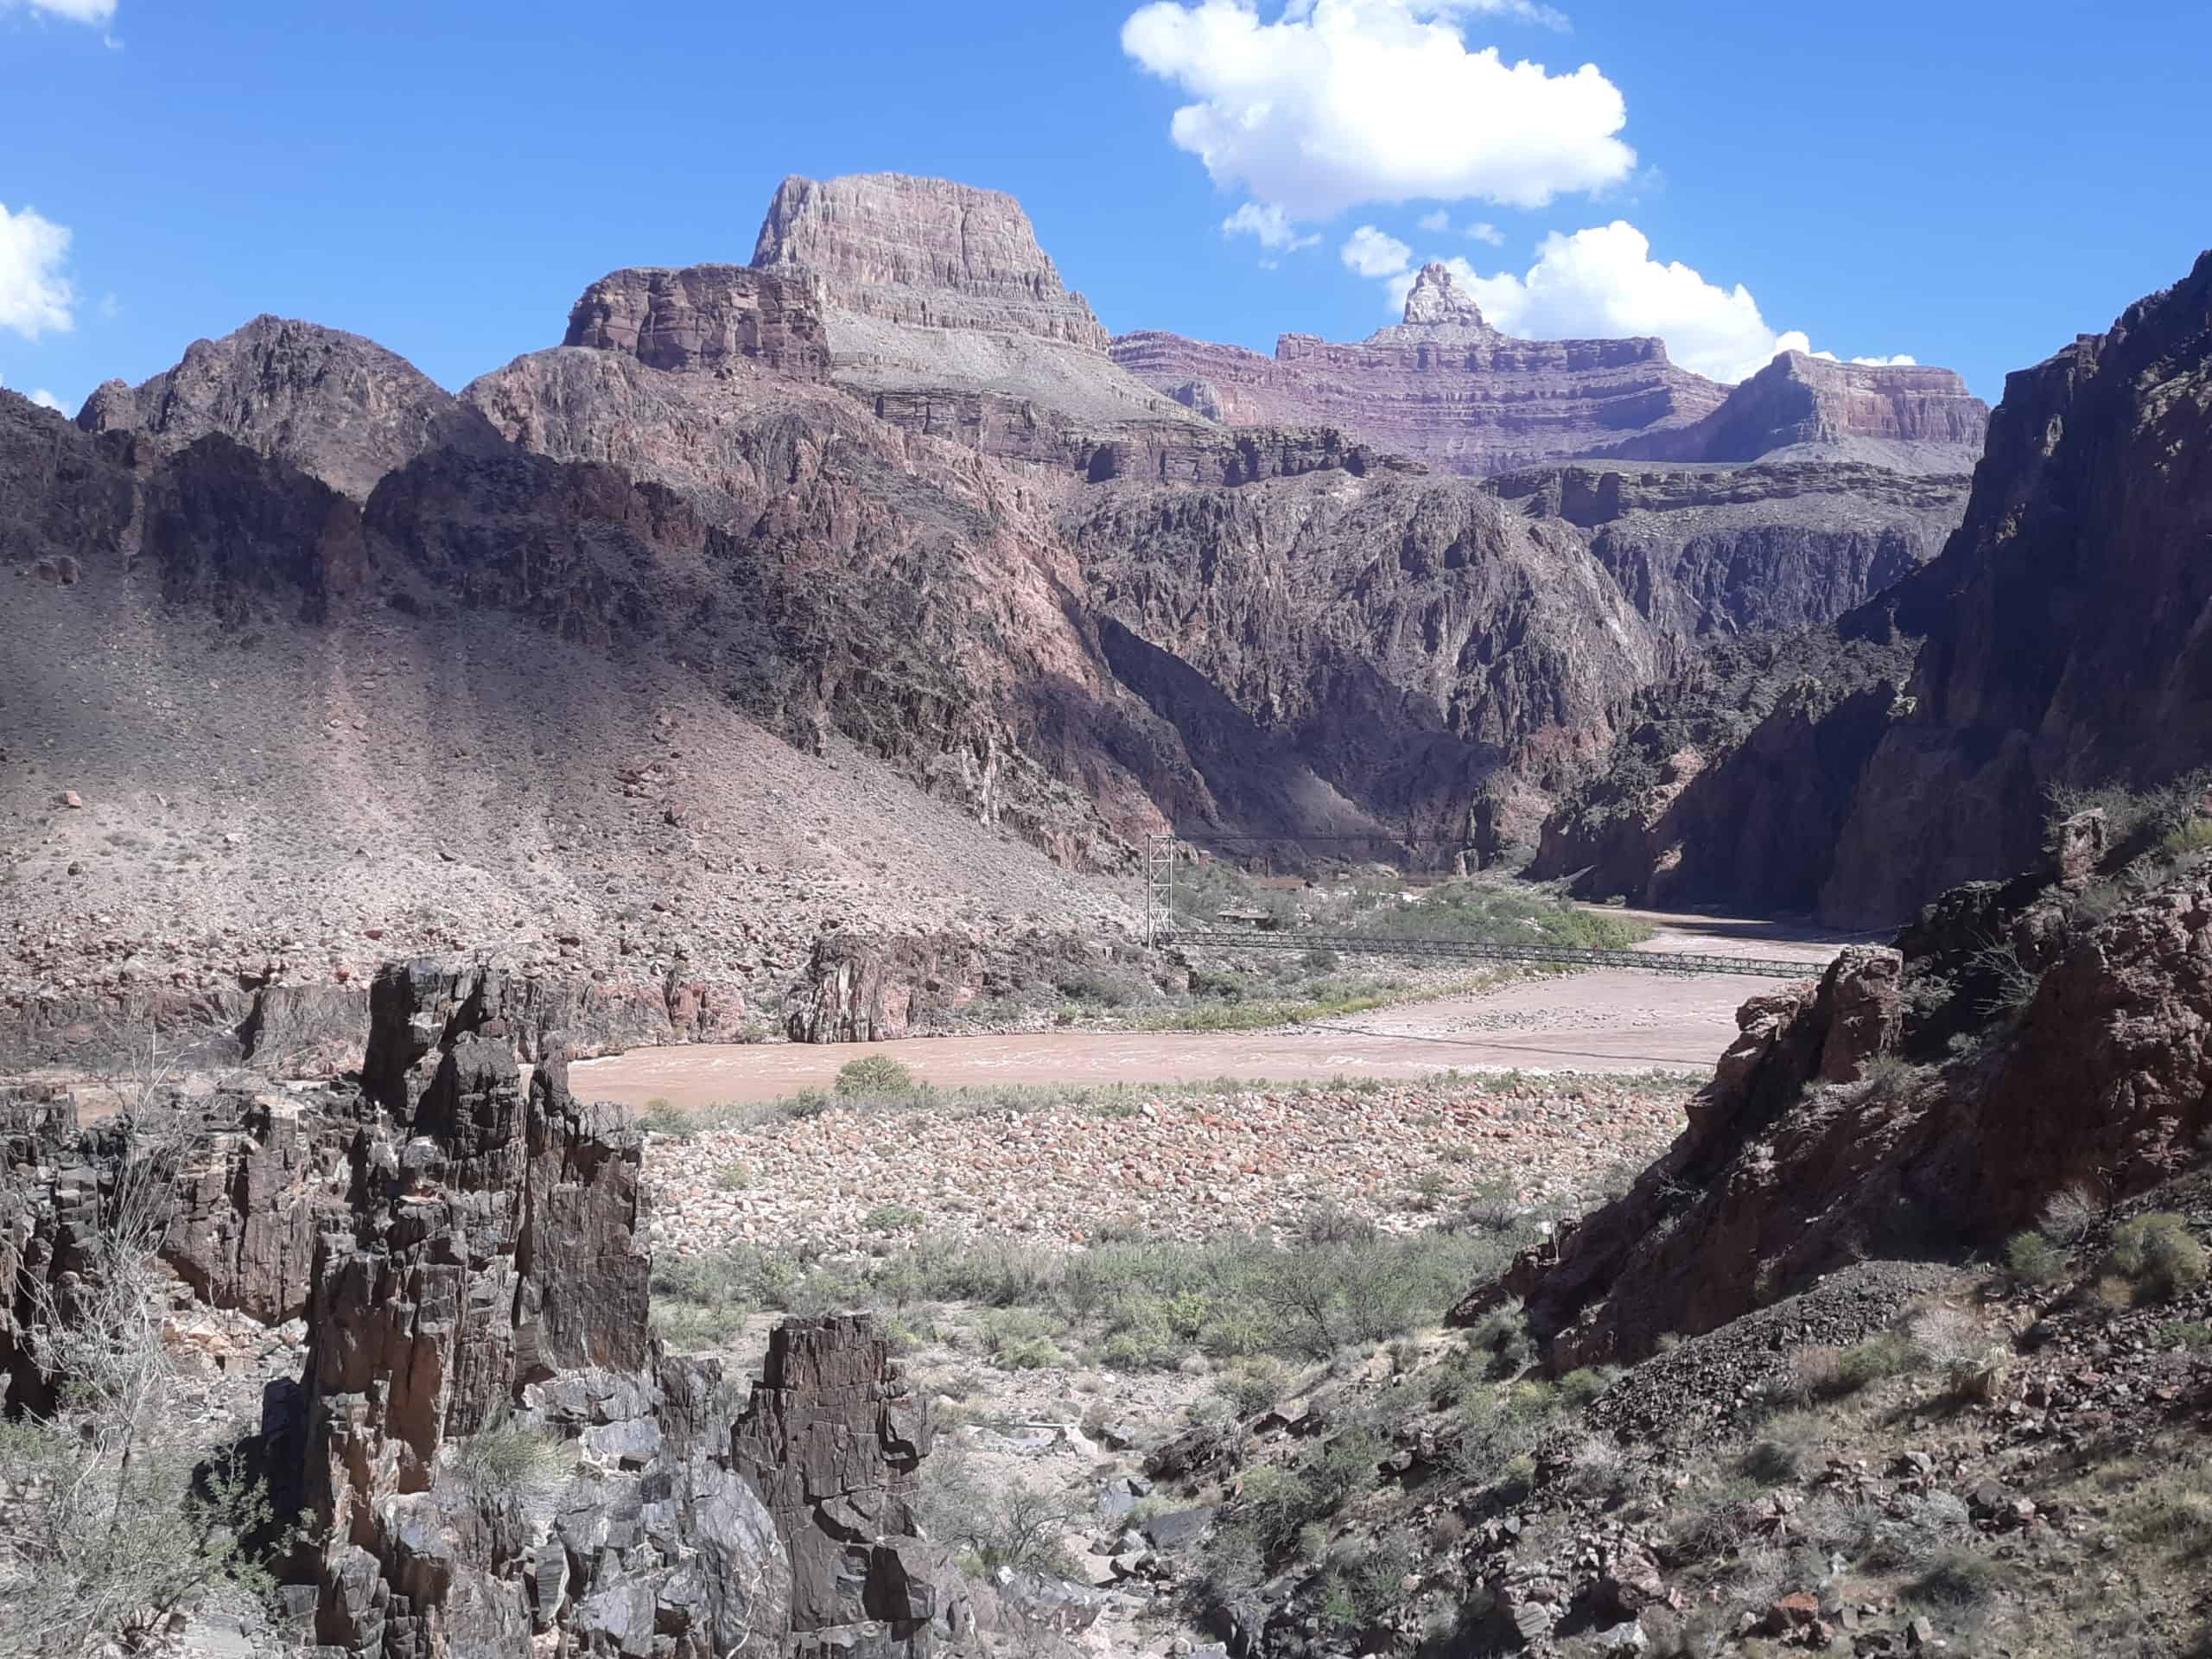
Before we jump into full trail reports of both the South Kaibab Trail and Bright Angel Trail, here’s a map of the route between the South Kaibab Trailhead, to Bright Angel Campground / Phantom Ranch, to the Bright Angel Trailhead.
Rim to River Trail Report Via the South Kaibab Trailhead to Bright Angel Trailhead:
South Kaibab Trailhead: 0 Miles, 7,200 Feet
If you are looking for the best views descending into the canyon, South Kaibab is the winner, and that is one reason why I would recommend descending South Kaibab for your Grand Canyon Rim to River hike!
Before you start on South Kaibab, remember that you can only access the trailhead by park shuttle, taxi, or walking – you cannot park or leave a car at the trailhead. Park shuttles are free, and you can find the seasonal schedules above. Taxi info is below:
- Grand Canyon Taxi: 928-638-2822
- Xanterra Taxi: 928-638-2631
There are bathrooms and a water fill station at the trailhead, but keep in mind that (hopefully) every hiker knows there is no water on South Kaibab, so there may be a long line to fill up with water, so to save time, consider filling up before arriving.


You will get the payoff almost immediately after descending South Kaibab. There are 4 major standouts along this portion of the Rim to River hike. At .9 miles down, you will hit Ooh Aah Point. The name says it all. At Mile 1.5, you will encounter Cedar Ridge, with expansive panorama views, and a bathroom! Skeleton Point is the next breathtaking viewpoint, at Mile 3. Finally, the 4th impressive viewpoint comes at Tip Off which is Mile 4.4. By the time you reach Tip Off, you will have already lost a little over 3,200 feet in elevation loss. And you’ll see the Colorado River below!
Ooh Aah Point: Mile 0.9
Ooh Aah Point is a fantastic viewpoint, but if you arrive early before dawn, don’t worry as there are several stunning viewpoints along the entire South Kaibab Trail!

Cedar Ridge: Mile 1.5
More views, plus a bathroom. it’s a little hard to tell where the trail continues from the expansive plateau – just keeping going straight!


Skeleton Point: Mile 3
And still more views!


The Tipoff: Mile 4.5
The Tipoff has a small shade structure and a bathroom. This is where I generally take my 1st quick break to shed any unnecessary layers, use the bathroom, and have a quick snack. Just past Tip Off, you will be able to catch your first big views of the ultimate goal – the Colorado River! Depending on recent weather conditions, you may catch the Colorado on an emerald green day, or a dark, muddy, and murky day! As you continue down, you’ll see more and more of it until you’re crossing the Black Bridge!


At about Mile 6, you will pass the tunnel and the Black Bridge, crossing the mighty Colorado River, and making your way towards Bright Angel Campground/Phantom Ranch, and then ultimately the Bright Angel Trail.


Once you cross the Colorado River, you’re technically on the North Rim side and the North Kaibab Trail. Proceed on towards Bright Angel Campground (and Phantom Ranch if desired). Remember, it’s about an extra mile to go to Phantom Ranch (half mile each way), or 17.5 miles roundtrip versus 16.5 miles roundtrip just to Bright Angel Campground.
Before you reach Bright Angel Campground and Phantom Ranch, you’ll pass a series of informational signs along the river that I highly recommend you take a minute to read. There’s also a water spigot at Boat Beach if you want to stop and refill water here, as there are sometimes more lines at Bright Angel Campground or Phantom Ranch.


Bright Angel Campground: 7 Miles, 2,500 feet
At Mile 7, you will reach Bright Angel Campground and Phantom Ranch (Phantom Ranch is just slightly further than Bright Angel Campground, an extra half mile). Look for the gentle Bright Angel Creek that winds through the campground area. This lush little oasis is the perfect snack break and rest stop, and you will want it before tackling Bright Angel. As long as I have been making good time and not gotten delayed, I like to take a 1 hour break at the bottom. This can include a trip to the Phantom Ranch canteen to enjoy some of their lemonade or a snack!


This is where I eat my biggest meal and take my longest break on the hike. I personally pack two meat and cheese or peanut butter and jelly sandwiches which I eat here, in addition to a hearty amount of hydration. You can get ice cold lemonade from the Phantom Ranch Canteen, but be sure to bring cash for it! I also like to take a few minutes to dip my feet in the ice cold Bright Angel Creek, and then change into a fresh pair of my Hilly Twin Skin anti blister socks! Bringing two pairs of socks is one of my gear recommendations for the rim to river hike.
**Insider Tip: so what snacks exactly are in my “lunchbox” for a Rim to River hike? Here’s a few of my favorites:
- peanut butter and jelly sandwich and/or
- meat and cheese sandwich
- RX bars
- Peanut butter pretzels
- Chips
- Olives
- Apple slices / oranges / grapes
- beef jerky sticks
- squeezable applesauce packets
- tuna packet
- NUUN tablets
- GU energy gels or chews
- Trail Mix
- Salt Tablets
- Coconut Water
- Glucose tabs
- Pickle Juice shots
- Payday bars or candy
If you are hiking during the warmer months especially, be sure to include a fueling and hydration plan that addresses sodium and electrolyte replenishment. You’ll see above that many of my snacks are balancing sodium (peanut butter pretzels, chips, olives, beef jerky), while I also like to replace my electrolytes more “naturally” (coconut water, pickle juice, salt tablets). While I personally opt for pickle juice, coconut water (natural electrolytes), and salt tablets or electrolyte chews, there are other options as well, including popular electrolyte drink mixes like LMNT, Liquid IV, or Tailwind. Whatever options you go, make sure you have a plan in place that you have tested out on training hikes. And it’s always a good idea to have a combination of ways to balance sodium and electrolyte replenishment, such as salty snacks + electrolytes + hydration. A proper hydration and fueling plan are a CRUCIAL part of my Rim to Rim training plan, which also applies to hiking Rim to River.
Before leaving Bright Angel Campground, be sure to fill up completely on water! There is no water after leaving Bright Angel Campground until you reach Havasupai Garden Campground, 5 miles later. And you will be passing through the hottest part of the Rim to River hike in those 5 miles, especially the exposed Devils Corkscrew.
When you leave Bright Angel Campground, you will cross over the silver suspension bridge, and then will start your ascent up the Bright Angel Trail. Look for the sign on the south side of the bridge directing you towards the Bright Angel Trail on the right. From Bright Angel Campground, you will have 5 miles until the next big stop at Havasupai Garden Campground.


Immediately after crossing the bridge and picking up the Bright Angel Trail, you will parallel the Colorado River on the right while overshadowed by tall cliff sides on the left. This part of the trail is briefly sandy and almost beach like, in addition to becoming hotter. But there are great views looking back towards the bridges and looking down on the Colorado River. If you are lucky, you may catch a glimpse of rafters on the water.

Pipe Creek Beach/River Resthouse: Mile 8.8
You will approach Pipe Creek Beach and its resthouse shortly, but there is no water here, and you should not actually go down to the “beach” or ever attempt to wade into the Colorado River, as it is very dangerous! Continuing on from here, you will start your traverse into the heart of the canyon and migrate away from the river. The heat will climb, the walls will close in, and the hottest part of the rim to river hike begins in full effect.
Just past Pipe Creek Beach, there is a series of switchbacks and a tough climb up from the canyon floor, that is referred to as the Devil’s Corkscrew. This series of switchbacks is fully exposed with very little shade, and the temperatures will surely be climbing at this point if you’re doing this hike in the warmer months. While the Devils Corkscrew switchbacks are not as challenging as the final climb out the South Rim walls purely from a numbers perspective, it is considered to be the potentially the hottest (and for some the hardest) part of the Rim to River hike, because of the heat and exposure. Take it slow here, and don’t overdo it. Absolutely stop and soak your shirt, hat, or whatever else you need to in any stream crossings you encounter! And don’t wring the water out, keep it soaking wet. This is why I recommend bringing a cooling towel, or just wearing a cotton shirt that holds in water and helps with evaporative cooling. It is probably the single best thing you can do, aside from hydrating consistently and monitoring your sodium and electrolyte levels, to help lower your core temperature. It is why I recommend wearing cotton, so that your shirt will hold that cold moisture and continuously cool you. You can find more recommendations on what to wear below my trail reports.


After climbing the series of switchbacks, you will be edging closer to the welcome relief of Havasupai Garden Campground, another lush oasis in the desert. You will continue to parallel the creek on the right side, and the canyon walls will become more “tunnelly” and level out some on approach to Havasupai Garden Campground. Once you start to see more green, you are close.
Havasupai Garden Campground: Mile 12, 3,800 feet
Havasupai Garden Campground (previously Indian Garden Campground) is a lovely little green spot along this brutal part of trail, and I would recommend stopping again here for 20-30 minutes for another snack break, bathroom break, and rest break. The hardest part of the trail is still yet to come. Havasupai Garden Campground has water and bathrooms.
*** At Havasupai Garden, you will see signs for Plateau Point. It is a 3 mile roundtrip point to point trail from Havasupai Garden to a plateau viewpoint. I wouldn’t recommend adding on any additional mileage at this point, but it is an option. If you happen to be camping at Havasupai Garden, then it is more of an option, but this post is for day hiking the rim to river.
After leaving Havasupai Garden Campground, there is about 4.5 miles left of your hike, and you will have a brief section of trail that is still slightly leveled out, though still hot and exposed. Then the real climb begins! You will know it when you reach it, because it will pick up in elevation gain substantially, and it won’t let up until you reach the top! The good news is at this point in the day, you will likely start to receive some shade from the canyon walls, so the tough climb up isn’t fully exposed. The temperatures will also likely have dropped at this point, so you will not have to deal with stifling heat as you climb out.


3 Mile Resthouse: Mile 13.5, 4,720 feet
1.5 Mile Resthouse: Mile 15, 5,720 feet
There are two resthouses as you climb out of the South Rim wall. 3 Mile Resthouse is, not surprisingly, 3 miles from the top and Bright Angel Trailhead, and 1.5 Mile Resthouse is 1.5 miles from the top. Both have water, and both have bathrooms.

***Note: there are times when water may be shut off, like when I completed one of my hikes in 2022. Both Resthouses had the water shut off due to a pipe leak. That is why I recommend carrying a full bladder of water ( capacity of 2-3 liters) any time you have the chance to fill up.
I would recommend stopping and using the bathroom facilities at one (or both) of these resthouses, even if you aren’t exactly feeling it right at that moment, as the trail becomes more congested at this point. If you find yourself needing to make an impromptu bathroom stop, you won’t have any privacy! The last 3 miles are full of day hikers, campers, Rim to Rim hikers, and tourists from the rim who are just going down into the canyon for a short jaunt. Enjoy the camaraderie and morale support that is offered from those around you, and dole some out as well!
About a mile from the top, you’ll pass through the first of two small tunnels, and you’ll know you are getting close! By now, your legs will probably be struggling, and it will be a slow climb out. However, enjoy the emerging night time glow of the canyon and those cooling temperatures.


Just near the trailhead, you will want to veer to the right to come out on the actual Bright Angel Trailhead and iconic sign. (If you veer left, you’ll come out by the Kolb Studio – no big deal, you’ll just need to head to the right to weave back towards the actual official trailhead).

Bright Angel Trailhead: Mile 16.5, 6,840 feet
Take a minute to enjoy the views from the top of the South Rim. If it is still light outside, you can probably still make out the little green dots of Havasupai Garden Campground below! As you take your picture by the Bright Angel Trailhead sign, you’ll probably be thinking you never want to do that hike again! But give it a few days, and you’ll probably be wanting to come back for repeats, like me!


Recap of the Rim to River Hike Via South Kaibab and Bright Angel Trails
These locations on the South Kaibab Trail and Bright Angel Trail have bathrooms.
- South Kaibab Trailhead
- Cedar Ridge (mile 1.5 from South Kaibab Trailhead)
- The Tip Off (mile 4.4 from South Kaibab Trailhead)
- Bright Angel Campground / Phantom Ranch
- River Resthouse
- Havasupai Garden Campground
- 3 Mile Resthouse
- 1.5 Mile Resthouse
- Bright Angel Trailhead
These locations on the South Kaibab Trail and Bright Angel Trail have water fill stations.
- South Kaibab Trailhead
- Bright Angel Campground / Phantom Ranch
- Havasupai Garden Campground
- 3 Mile Resthouse
- 1.5 Mile Resthouse
- Bright Angel Trailhead
Recommended Gear for a Rim to River hike
I’ve already gone through the trial and error with hiking in the Grand Canyon many times, including Rim to Rivers, Rim to Rims, and many hikes along the tops of both rims. I’ve learned what works for hiking into the canyon, and what doesn’t. I can tell you what I wish I had taken on my first hike that I didn’t. All my gear recommendations are products I have tried and personally use. For an in depth dive, check out my sister post on Grand Canyon hiking essentials, or just keep reading to find out about my recommended gear for a Rim to River hike.
Recommended Gear Quick Links
- Trail Runners: HOKA One One Speedgoats
No products found.
- Socks: Hilly Twin Skin socks
No products found.
- Water Hydration System:
No products found.
No products found.
- Daypack: Camelbak Helena 20 Liter Daypack
(Make sure you have plenty of carabiners attached to your daypack also)
No products found.
- Environmental Protection:
-
- Sunscreen
- Sunglasses
- Hat
No products found.
- Snacks:
-
-
- peanut butter and jelly sandwich and/or
- meat and cheese sandwich
- RX bars
- Peanut butter pretzels
- Chips
- Olives
- Apple slices / oranges / grapes
- beef jerky sticks
- squeezable applesauce packets
- tuna packet
- NUUN tablets
- GU energy gels or chews
- Trail Mix
- Salt Tablets
- Coconut Water
- Glucose tabs
- Pickle Juice shots
- Payday bars or candy
-
No products found.
No products found.
No products found.
One more plug because it’s that important – if you are hiking during the warmer months especially, be sure to include a fueling and hydration plan that addresses sodium and electrolyte replenishment. You’ll see above that many of my snacks are balancing sodium (peanut butter pretzels, chips, olives, beef jerky), while I also like to replace my electrolytes more “naturally” (coconut water, pickle juice, salt tablets). While I personally opt for pickle juice, coconut water (natural electrolytes), and salt tablets or electrolyte chews, there are other options as well, including popular electrolyte drink mixes like LMNT, Liquid IV, or Tailwind. Whatever options you go, make sure you have a plan in place that you have tested out on training hikes. And it’s always a good idea to have a combination of ways to balance sodium and electrolyte replenishment, such as salty snacks + electrolytes + hydration. A proper hydration and fueling plan are a CRUCIAL part of my Rim to Rim training plan, which also applies to hiking Rim to River.
- Emergency/First Aid Kit:
No products found.
No products found.
- The Right Layers:
-
- Non Chafing Shorts or Leggings
No products found.
- Navigation:
No products found.
No products found.
Emergency Shelter:
No products found.
- Personal Items:
-
-
- Cash for Phantom Ranch
-
No products found.
Training for a Rim to River hike in Grand Canyon
So, how do you properly train for a Rim to River hike in Grand Canyon?
First of all, be intentional! Don’t just wing it, don’t train a week in advance, and don’t train “when I get around to it”. You are going to need to commit to training regularly for months in advance to safely hike a Rim to River.
I have a full post that goes in depth into training for a Rim to Rim hike , but it applies to any version of inner canyon hiking in the Grand Canyon (because most of them involve some serious descents and ascents no matter where you hike into the canyon!). It includes 8 parts to a comprehensive Grand Canyon hiking training plan, including the chance to snag a FREE TRAINING CALENDAR!
I hope this Rim to River guide achieves the goal of getting you to the bottom, and then back to the top, of the Grand Canyon, safely! It is a achievement you’ll never forget, and a memory hard to top!

*Did you know that I now offer 1:1 Coaching Plans and Consults for any type of Grand Canyon hike? Whether it’s a full Rim to Rim, Rim to River, R3, or another form of canyon hiking, you can take advantage of 1:1 support, accountability, and coaching throughout the entire training and planning process – fill out this INTEREST FORM to reserve your spot today!
Helpful Resources:
RELATED RESOURCES:
- 1st Timers Guide to Hiking Rim to Rim in One Day
- Complete Rim to Rim Training Plan
- Rim to Rim Visual Guidebook for 1st Timers
- South Kaibab vs. Bright Angel
- Complete Rim to Rim Packing List
- Grand Canyon Inner Corridor Trails
- 1:1 Coaching Plans and Consults – get more info and RESERVE your spot HERE!
PIN for LATER!

Last update on 2023-08-09 / Affiliate links / Images from Amazon Product Advertising API