A Complete Step by Step Rim to Rim Training Plan
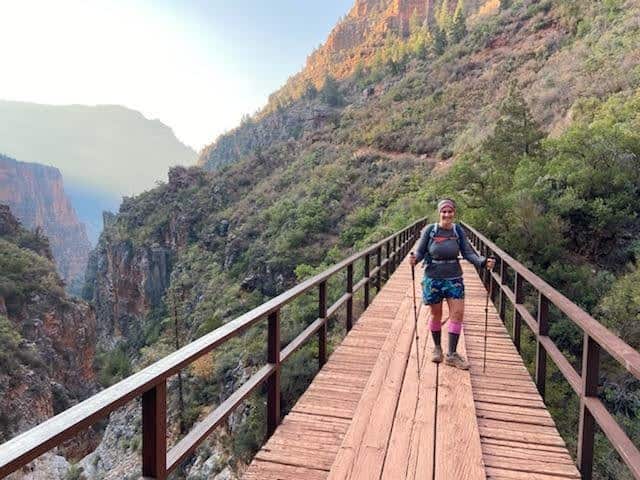
Imagine 21 to 24 miles of staggering descent, rugged red rock trekking, potentially blistering heat, and a monstrously steep ascent waiting for you at the end of a full day of hiking! That is what you are getting yourself into if you decide to take on the iconic Rim to Rim hike in Arizona’s Grand Canyon National Park! Before you step foot on this breathtaking and awe-inspiring trail, make sure you’ve developed the right foundation by using a complete and detailed Rim to Rim training plan. Why do you need to go through training for a Rim to Rim hike? Because as beautifully posed as those pictures on Instagram are, the Rim to Rim hike has to be taken seriously, and treated with the respect it deserves. There are deaths every year in the Grand Canyon and below the Rim, and many of those are hikers that are unprepared or do not understand the gravity of the challenge they are undertaking. There is a misconception that because it is a highly visited National Park, that the Grand Canyon must be easily accessible to all. Do not buy into this myth. Instead, develop a strategic plan for training for a Rim to Rim hike, and put in the necessary legwork ahead of time. This will enable you to responsibly and safely not only enjoy one of the most spectacular scenes in the world, but confidently conquer one of the most difficult hikes on the globe, the Grand Canyon Rim to Rim hike. The most important part of training for a Rim to Rim hike starts here, with this complete, detailed, and step by step guide that covers everything leading up to the day of the Rim to Rim! You can’t afford to skip this step – start building your own Rim to Rim training plan today! For all the grueling work that goes into pulling off a Rim to Rim hike, the payoff is more than worth it to know that you are that hiker with the grit and determination to put in the work and properly bag one of the hardest hikes out there! And you’ll be among the small handful of Grand Canyon visitors who actually get to experience the whole Grand Canyon, from rim to canyon floor to rim!

Disclosure: Below are some affiliate links-these are all products I highly recommend. I won’t make any recommendations on this page that I haven’t tested or personally used! Enjoy this guide to training for the Rim to Rim in one day!
Table of Contents
Complete Rim to Rim Training Plan
Training for a Rim to Rim hike is unlike any other endurance hike out there. A “reverse” mountain, where the descent comes rapidly at first, and the climb comes at the end. Even if you are a experienced hiker, 14’er summitter, trail runner, or cyclist, training for a Rim to Rim is a whole other beast, and requires a targeted training plan that not only addresses the unique aspects of this hike, but also the elements you’ll encounter. Rest assured, you can accomplish this hike no matter what your current background is. Not only will I show you how to implement a targeted Rim to Rim training plan, but I’ll help you determine if you need to establish a baseline foundation first before beginning targeted Rim to Rim training. Below you’ll find all the STEPS to developing a targeted Rim to Rim training plan. Follow these steps and you will be prepared and ready for the epic Rim to Rim hike, no matter what stage you are at today!
These steps include how to actually formulate a Rim to Rim training schedule, and what it should look like. Once you have the “skeleton” of your training calendar developed, we’ll start to fill in the “muscles” by diving into the 8 parts of a targeted Rim to Rim training plan, and the role that all 8 of these parts play in effective training and preparation. You can get a sneak peak of these 8 parts below:


Step #1: Start Formulating Your Rim to Rim Training Plan
One thing I have learned from experience time and time again, is that there is no way you can just wing your training. Whether you are training for a half marathon, an invigorating long distance trail run, a century bike ride, or a 24 mile long day hike in the Grand Canyon, the key is being INTENTIONAL. Your current fitness level, your pace, your strength, your location and accessibility to training hikes – all of that is not as important as an intentional mindset. The fact that you may have never hiked more than 5 miles before is less important at this moment, than having an intentional mindset and an intentional plan. You have to be willing to put in the work!
The foundation of a well implemented Rim to Rim training plan is INTENTIONALITY! This means you have to intentionally SCHEDULE your training hikes, your rest days, your cross training and strength training workouts, your nutrition, your taper period, and everything in between.
As you begin training for the Rim to Rim, know that your hiking training plan will include longer and gradually incremented training hikes, rest days, and cross training / strength training days. These 3 components will need to occur on a weekly basis. You’ll get a chance to grab an example of a Rim to Rim training plan and see for yourself, so keep reading! Get your calendar out now and a pencil or pen, and get ready to schedule your Rim to Rim training calendar!
Step #2: Develop Your Rim to Rim Training Calendar
Hiking can be largely a mental game. If you tell yourself that you will get around to hiking those training hikes “when I have the time”, I promise your mind will attempt to talk you out of it every time. I know because I have been there plenty of times.
You have to intentionally set aside the time by actually scheduling every component that goes into training for a Rim to Rim hike. And consistency is key! The 3 big consistent components of a Rim to Rim training plan are training hikes, cross training / strength training days, and rest days.
The one thing that has worked like magic for me that I would highly recommend, is to first of all, determine your designated weekly “hiking” days. At least one short hike, and one long hike, each week. I know this isn’t always possible, but it is enormously helpful to attempt it. These will be the two days a week you do your short and long training hikes. Spread them out if possible – as in, don’t do them back to back. An example of this would be completing your short hike on Wednesdays and your long hike on Saturdays. If you don’t designate a day, it is much easier to come up with a million reasons why you can’t get around to hiking that week.
My designated long hike training day is Saturday, as I will demonstrate when I share my own personal hiking training calendar later in this post – which you’ll be able to download for yourself! Sure, things come up and adjustments have to be made at times. But if you have your hiking training days marked on the calendar (and I do literally schedule all my hiking training days on my calendar 4 months out or longer) and have given them priority, you will find that other things that pop up have a way of being able to be worked around your training schedule.
So yes, I literally have my hiking training days marked on my calendar, months in advance, and I highly recommend you plan out your hiking training days as well. I even go so far as to check off or highlight each hike on my personal calendar when completed.
How Long Do I Need to Train for a Rim to Rim Hike?
Now the next somewhat obvious question is, how many weeks out am I scheduling weekly training hikes? How far out do you need to start training for a Rim to Rim hike? This is an individual question that has to be built around where you are at the moment personally.
You should NEVER attempt to “wing it” when hiking a Rim to Rim hike. Please don’t do one 6 mile hike prior to attempting and think you are ready. When developing your own Rim to Rim training plan and calendar, be honest with where you are, and how much time it will take to get to the final goal.
The final goal is that epic 21 to 24 mile hike (21 miles South to North / 24 miles North to South) with a ton of environmental elements and elevation gain to deal with. That means, you need to have at least a couple other long distance practice hikes under your belt before attempting the Rim to Rim, with the ultimate goal to complete a couple training hikes between 16 – 20 miles in length for your longest pre – Rim to Rim hikes.
Another big NO is jumping immediately from a 3 mile practice hike to a 16 mile practice hike in a week. The key to hiking training is to gradually increase in INCREMENTS. This is a critical key in training for any long distance event, from cycling to running to hiking! If you skip this step and make huge leaps, you are much more likely to face injuries, and that will derail you quicker than the time it takes to properly progress in increments.
Given all of this, now it is time to work backwards and determine how much time you may need to be ready to hike the Rim to Rim. Be honest, and determine where you are now. Finally, you can take a deeper dive into this topic by checking out my full article “How Long Do I Need to Train for a Rim to Rim Hike?“.
Determining Your Current Baseline Foundation
I always recommend assessing where your baseline foundation is NOW. You need to have a solid baseline foundation from which to build on before beginning any targeted Rim to Rim training. I personally recommend at least 4 months of targeted training for a Rim to Rim hike. However, if you are brand new to hiking and currently only hiking 1 mile per week, you’re going to need to spend some time developing a baseline foundation first. Which means backing up your training timeframe by a couple months to get that foundation in place.
What does a baseline foundation look like? For the Rim to Rim, I recommend that your baseline foundation look like this: 60 minutes of moderate cardio workouts, 3 x a week, consistently and comfortably.
These 60 minute workouts could include:
- a 60 minute hike
- a 60 minute bike
- a 60 minute run
- a 60 minute strength training workout or HIIT workout
This is not an exhaustive list, but just a few common examples. Not all 3 weekly workouts need to be hiking, but at least some of them should.
Again, if you can complete 60 minutes of moderate cardio 3 x a week consistently and comfortably, then I’d say you have a baseline foundation that can support targeted Rim to Rim training.
You don’t need to be killing yourself to prove anything on these workouts. Moderate is key. You don’t need to run an 8 minute mile during those 60 minutes, or scale 3,000 feet of elevation gain on a 60 minute hike. The key is sustained moderate output that you can do comfortably and consistently each week. If you are having to stop and catch your breath every 2 minutes, you probably need to keep at it a while longer to keep developing that baseline foundation. Once you’ve got it, you can jump into your targeted Rim to Rim training, whether that’s a 4 month plan, or even longer. 4 months is the minimum amount of time I’d recommend to train for a Rim to Rim, but there’s nothing wrong with longer.
No matter what stage of training you are at, make sure that everything happens in GRADUAL INCREMENTS. This is true for developing a baseline foundation as well as a targeted Rim to Rim training plan.
For example, if your current hiking abilities are in the 3 mile range, then you are going to want to start there. Do a couple weeks of 3 mile practice hikes in a row. Then move up to 4 mile hikes for a couple weeks. Then move up to 5 mile hikes for a couple weeks. And so forth. Gradually, you’ll get up into the double digits. These are significant distances, so don’t skip weeks, and allow your body time to “process”.
Example Rim to Rim Training Calendar
Now’s your chance to grab an example of the 16 week Rim to Rim training plan I use myself! Not only have I used this hiking training plan for all my Rim to Rim hikes, but also for other long distance hikes like the 50 state high point hikes in the U.S., the 21 mile hike at Mt Whitney, CA, Rim to River hikes in Grand Canyon, and the Guadalupe Mountains’s 20 mile long McKittrick Canyon hike.
Get Your Rim to Rim Training Calendar HERE!
*Want more support options? I now offer 1:1 professional coaching and support to help develop your own INDIVIDUALIZED Rim to Rim training plan like the one you see above. Let me help you create your OWN plan for success with tailored cross training and strength training, incremental mileage volume and distance, and practice hikes built in that work for YOU! I’ll assess where you are today, and build you a plan to get you where you need to be! Fill out this INTEREST FORM to get started HERE!
*Important Things to Note About this Example Training Calendar Above:
- Assess where you are currently based on experience, age, physical fitness, etc. Not every training calendar will be exactly right for you just as it is.
- It assumes a regular hiking foundation of 60 minutes. If you aren’t there yet, you need to give yourself more time beforehand to develop that foundation.
- If this progression seems too quick, then allow for more time, possibly 20 or 24 weeks. Be comfortable with your increments.
- The rest and cross training / strength training days are just as important as training hikes. I help customize exactly what these days should look like in my coaching plans and consults.
- It is ok to adjust, take a day off, add an extra rest day, etc. It is important to listen to your body, while remaining intentional.
Because my foundation varies from time to time, this Rim to Rim training plan calendar sometimes gets adjusted as well, which is ok for you to do. But it provides a starting foundation as you can see, and is great for beginners looking to make it to the Rim to Rim hike. ***The key is to keep your training calendar intentional, to progress in gradual increments, and to build in rest and cross training / strength training to support your weekly hiking.
***Don’t miss this example Rim to Rim Training Calendar! Grab it HERE!
As you can see, training for a Rim to Rim hike takes TIME. Even for experienced hikers, the commitment is still months long. But this is undeniably the most important step in formulating the foundation of a solid Rim to Rim training plan.
So get out your calendar, begin scheduling your weekly training hikes, workouts, and rest days for as many months as you determine you will need to get to that final destination – the Rim to Rim hike!
Scheduling Cross Training and Strength Training Days
Once you have your calendar ready and know how many weeks and months you will need, the next step is to fill in the rest of the muscles of your training calendar. Your designated weekly hiking training days should take first precedent in making your calendar, but after that you need to schedule the 2 other important components: cross training / strength training days, and rest days.
So what exactly are cross training and strength training days? First off, you should aim to have 3 – 4 days a week of cross training and strength training. Cross training and strength training go hand in hand, and both overlap with each other. Cross training is basically the additional activities you do in addition to hiking, that keeps your whole body and all the different muscle groups and system working harmoniously together. Cross training not only prevents injury, but allows your body to function as a whole, which is going to improve your hiking performance immensely.
As a long distance runner, cyclist, and hiker, I can testify first hand how much running has helped my hiking game, and how much hiking has helped my running game, and how much cycling has helped both. They are all intertwined and play off each other! Cross training can look different for each person, and the beauty is that you can choose!
Cross training days could consist of a swift walk, a run or jog, a bike ride, Pilates, kayaking, weight lifting, strength training, or HIIT workouts.
The important thing is to avoid paralysis by analysis when it comes to cross training. Consider what things you may already be doing that can count as cross training, and build those in. Progress in them, challenge yourself, and throw in some additional sources of beneficial cross training as well. I personally run, cycle, and strength train as my own cross training for the Rim to Rim.
The other important thing is to not get too comfortable with cross training. Cross training can incorporate a lot of different activities, but it shouldn’t be ONLY ONE activity. You shouldn’t just walk on ALL the cross training days on your training calendar. Challenge yourself to incorporate some new and even more challenging cross training activities.
And finally, make sure that your cross training is FUN, and something that you look forward to doing. Yes, make sure it’s beneficial, but looking forward to cross training is a great strategy to fighting burnout, both mental and physical.
Once you’ve determined the cross training days that work for you, work in at least 60 minutes of cross training, 3 -4 times a week. You will see this demonstrated as well on my own personal hiking training calendar that I shared above.
Next up is strength training. Again, a strength training workout can count as one of your cross training days. Or a strength training workout could be something you do in addition to your cross training. For example, maybe you cycle for 60 minutes and then do a 30 minute strength training workout. The important thing is that you do some strength training.
Targeted strength training workouts help strengthen your body, your muscle groups, prevent injury, and encourage proper hiking mechanics and form. As a side product, it’ll also help you build the strength and stamina for that enormous Rim to Rim distance, elevation gain, and elevation loss.
What kinds of strength training moves are the best for Rim to Rim training? Think lunges, squats, deadlifts, heel/calf raises, step ups, and glute bridges.
Or better yet, take the guesswork out of it and just download this Rim to Rim Strength Training Workout.
This “choose your own path” strength training workout is customizable, simple to follow, targeted for Rim to Rim training, and can be done from anywhere!
And again, strength training workouts can be stand alone workouts, or done in conjunction with other cross training on your cross training / strength training days. Just be sure not to skip it.
Scheduling Rest and Active Recovery Days
And finally, schedule rest days, 1-2 days a week. I like to schedule at least one of my rest days following my long training hike for the week. Rest days are vitally important, so make sure that you follow them. They allow your body to repair, recover, and solidify your training, which actually makes you stronger.
Rest days don’t mean you have to sit on the couch and not move all day. Active recovery on rest days can look like a short easy walk, yoga, stretching, foam rolling, etc. And don’t forget to make sure and get plenty of sleep!
As you can see, intentional scheduling is a critical component. If all you do is hike, you run the real risk of burning out, mentally and physically, and run the risk of overuse or injury. Your body will perform at its peak when all the muscle groups and systems are firing symbiotically. So even though you may feel like another training hike is more beneficial than a cross training / strength training day or a rest day, be consistent in giving your body all forms of training.
And on a related note, it is completely ok to have off days, to have training hikes that feel miserable, and to drag on some of your training days. You are allowed to have off days. You will come back from an off day. What you want to avoid is pushing through a situation you know you shouldn’t, such as an injury. An off day is way easier to come back from than an injury!
Don’t forget, you can grab your own example Rim to Rim training calendar HERE!
Step #3: the 8 parts of a Targeted Rim to Rim Training plan
Your best Rim to Rim experience will incorporate all 8 of these parts of a Rim to Rim Training Plan. Each part serves a vital role to play in preparing to tackle the Rim to Rim. There are 4 main elements specific to the Rim to Rim hike that this training plan aims to focus on:
4 Elements to Train For:
- Elevation Gain and Loss
- Heat
- Distance
- Pace
How do I approach these elements through training – with 8 parts!
The next part of this training guide will show you how to seamlessly weave these 8 parts together to form a targeted Rim to Rim training plan.
#1: Time on Feet
While most people tend to focus on training for the uphills, I’d argue that the most important thing to train for when it comes to a Rim to Rim hike is time on your feet. Yes, training for time on your feet is even more important than training for the uphills. Which is good news for you “flatlanders” out there just like me! You CAN hike the Rim to Rim even if you don’t live next to 14’ers in Colorado! I certainly don’t! All you really, truly need to start with Rim to Rim training is somewhere where you can hike and work up to 18ish miles of hiking. That doesn’t mean you have to have an 18 mile long hike – I do dozens of loops on my local 1.5 mile long loop trail frequently. My Rim to Rim training plans absolutely address the need to prepare for the ascents and descents of a Rim to Rim hike, but rest assured, if you incorporate all of the above 8 parts into your training, you can train from anywhere! Starting with time on your feet.
The average Rim to Rim hike takes between 12 – 18 hours, and you need to train your body to be consistently going and giving output in preparation for that amount of time and distance.
Need help determining your preferred Rim to Rim hiking direction? – check out my 1st Timers Guide to Hiking the Rim to Rim in One Day!
Your aim should be to gradually work up to your longest training hike being between 16 – 20 miles. A couple of these distance hikes is even better, if time allows. Whether you hike 16, 18, or 20 miles for your longest final training hikes may depend on your timeframe, your hiking experience and background, or other personal preferences. A minimum of a couple 18 mile long training hikes is the sweet spot for me.
How do you get to this point in terms of time on your feet? As I reviewed earlier in this article, you do that by completing at least 1 short weekly training hike, and 1 long weekly training hike. Both your short and long weekly hikes will increase in distance, but your long hikes will obviously increase more. In case you missed it, you can grab an example of a 16 week Rim to Rim training calendar HERE to see what these weekly increments look like.
These mileage increases MUST increase GRADUALLY, in increments. If you want to get nerdy about it, consider the 10 – 15% rule that many long distance runners are familiar with. This simply means that your weekly mileage volume should only increase by 10 – 15% each week. This helps to prevent overuse and other common injuries, as well as build a solid foundation that will hold up stronger over time.
#2: Training for the Uphills
#3: Training for the Downhills
Again, whether you have it naturally or not, you can supplement with strength training exercises, as well as a focus on stability training, posture, hiking mechanics, and the use of special gear like trekking poles. The downhill portions of the Rim to Rim can be just at tricky as the uphills, so you definitely need to pay attention to that during training.
I won’t go into a lot more in regards to downhill training now, because you will be able to see how you can train for it using stability training, posture, and hiking mechanics, which are coming up next. I will make a note here though that certain “gear” items are worth considering for downhill training.
First off, trekking poles. This can be lifesavers for rough descents. If you have existing knee issues or other joint / muscle issues, consider using them. But make sure to use them in your training hikes, not just the day of your Rim to Rim. Getting the “feel” for hiking with poles takes practice. Make sure that you have them measured to where they create a 90 degree angle with your arm. Also make sure to shorten them 5-10 centimeters for uphills, and lengthen them 5-10 centimeters for downhills. Rubber tips on the bottom also help. My favorite trekking poles are these Black Diamonds, mostly because I love how lightweight they are, and I love the cork handles. The cork helps to prevent my sweaty hands from slipping around like what sometimes happens with other rubber and plastic handles. Plus the fact that I’ve had the same original pair of Black Diamond trekking poles for my entire adult hiking career. Yes, they’re expensive, but I consider them a steal for their longevity and use.
Secondly, I never tackle aggressive downhills without taking a couple Ibprofen first. Same goes for my trail running. I have found that a couple Ibprofens before any hard, repetitive impact exercise works wonders for preventing inflammation from popping up during or later.
Lastly, don’t be afraid to slow your pace on downhills. No need to fly through them. This can catch up to you later.
#4: Stability Training – Posture, Mechanics, and Form
Stability training involves proper hiking posture, mechanics, and form. I go in depth into this part of Rim to Rim training in my coaching plans and consults.
Stability training includes learning to attack uphills by not leaning forward into them, and downhills by not leaning back. The body’s natural tendency is to try to maintain the center of gravity by leaning forward on uphills and leaning backwards on downhills. Keeping your body up with your chest upright during uphills and downhills will help to alleviate a lot of unnecessary pressure on the joints as well as unnatural hiking posture. You don’t want to hike rigid like you have a steel bar in your back, but if you can practice hiking upright on uphills and downhills, you’ll notice your strength improve over time as the right muscles become engaged and strengthened – thus improving your stability and posture and making your uphills and downhills more energy efficient.
Another tactic related to stability is keeping your feet flat when you go up inclines, instead of lifting that back heel up and pushing off with just the front of your foot. This was a tip I learned years ago from my guide when hiking Mt. Hood in Oregon. A lot of times our natural response to climbing inclines is to lift our heels up and push up primarily through the balls of our feet. Keeping your foot flat and pushing off with the whole foot might feel harder at first, but it will strengthen you if practice over time. And also prevent the awkward ankle angle and unnecessary joint pressure.
Other posture, mechanics, and form training involves how to incorporate the benefits of sidestepping on uphills and downhills (another nod to my training on Mt. Hood). Instead of attacking an uphill or downhill “straight on”, attempt to use sidestepping. This not only better enables you to keep your foot flat on the ground as mentioned above, but it helps distribute the job of climbing to more strengthened muscle groups. Just make sure to switch sides if you use sidestepping, and alternate leading legs / feet.
In addition to the tips just mentioned, of course targeted strength training exercises can also increase the strength in certain muscle groups involved in stability training.
#5: Strength Training
We already talked a lot about strength training earlier in this Rim to Rim training guide. Strength training workouts should be done a couple times a week, either as stand alone workouts or in conjunction with other cross training that day. Strength training moves like lunges, squats, deadlifts, heel/calf raises, glute bridges, and step ups are all fantastic for Rim to Rim training. This Strength Training Workout shows you how to incorporate all these strength training moves in a simple, easy to use, customizable workout.
Strength training could also include workouts like rucking, which I highly recommend! I started rucking years ago when I wanted to find a way to bring my kiddo along with me on hikes. So I started hiking with him in an Osprey Poco Carrier. Turns out, that is rucking, just didn’t know it then. Now I know there are ton of benefits to rucking, and it is a great form of strength training. What exactly is rucking? It’s basically hiking with a weighted pack, or in my case, a toddler in a carrier. It’s not hard to get started with rucking, and it’s not overly complicated. You can even branch out into doing other beneficial weighted workouts to prep for your Rim to Rim, like weighted step ups and step downs.
Walking Backwards
Another method of strength training that is specifically tailored to Rim to Rim training is walking backwards. There’s been a lot of recent focus on walking backwards for Rim to Rim training, so I will address it here. No, this isn’t a new fad, it’s been around for quite some time and has proven benefits. Check out this study from 2022 that analyzed the benefits of walking backwards. It’s been used for rehab purposes for those suffering from knee, hip, and joint pain, and also as preventative strength training too.
Benefits from walking backwards include:
- Improved balance, coordination, flexibility, and gait
- Strengthens muscle groups (like the glutes, hamstrings, and quadriceps) while also activating and engaging them in different ways
- Engages core muscles
- Low impact and low pressure on knees
- Helps prevent joint pain
- Burns more calories than forward walking
It’s absolutely worth it to build in some time walking backwards as part of your strength training. This can be naturally outside on roads and trails with some incline, or on a treadmill. Just raise the incline, unplug, and walk backwards. As always, work up in time and incline gradually in increments. I’d worry less about speed and more about incline and time spent walking backwards. This is a great overall workout that helps with injury prevention, strengthens for uphills and downhills, and builds stability and good hiking form.
Want a simple way to get in some strength training time? Use this customizable Rim to Rim Strength Training Workout. It’s simple, targeted, and can be done from anywhere!
#6: Cross Training
Can include strength training, plus additional cross training workouts you do on a weekly basis while training for the Rim to Rim. I always advise to make sure your additional cross training is something you enjoy! Some common cross training I see is cycling, swimming, walking, Pilates, and running, but I also enjoy seeing individuals throwing in things like kickboxing! Whatever it is, aim for at least 3 times a week and at least 60 minutes a session.
#7: Pace
While it is important to hike your own hike and enjoy the moment of the Rim to Rim, there’s still a case for having a healthy pace with a 21 – 24 mile long day hike, depending on your directional route. Aim to finish during daylight hours for safety. A healthy pace can also get you through the hotter and more dangerous sections faster before temperatures rise. And there are a few other reasons as well. While you don’t need to set a blistering pace, especially on the uphills, I would still encourage a 2+ mile an hour average pace for a Rim to Rim, which often requires training for. I usually state it this way – practice nearing a 3mph pace on flats, and a 2 mph pace on uphills and downhills. That tends to average out somewhere in the middle, with a 2.5 mph pace what I would consider a good place to be.
So as you build up your hiking stamina and endurance with your training hikes, start to focus on your pace. Start to learn how much output your body is capable of giving consistently at what pace. Start to gauge when your body actually requires a break. Start to learn your hiking pace and how much your body can consistently and healthily give over an extended period of time, and be able to maintain.
As with everything else, work on your pace gradually and in increments. Don’t ever try to push your body faster than it is ready for. When you give yourself enough time to train, your body naturally becomes stronger and more efficient While pace shouldn’t be the most important thing to focus on, I believe a healthy pace can be beneficial to have on a hike like the Rim to Rim.
#8: Rest and Recovery
Rest and recovery are crucial to any training plan for any endurance event! Your body actually gets stronger when it is allowed to rest. A rest day doesn’t mean you have to just sit on the couch and not move all day – active recovery can include yoga, a short easy walk, foam rolling, etc. Plus don’t forget to refuel, rehydrate, and get plenty of sleep!
The taper period also falls under rest and recovery. This is the period of time 2 – 3 weeks before your Rim to Rim where you scale back the VOLUME of mileage. I will discuss this in more detail below. A typical taper period looks like:
- 3 weeks out – 25% volume reduction
- 2 weeks out – 50% volume reduction
- 1 week out – 75% volume reduction
Tips for Developing a Rim to Rim Training Plan:
- Assess Your Baseline Foundation
- Train at Least 4 Months in Advance
- Schedule Your Training Days on Your Training Calendar – in ADVANCE!
- Complete Multiple and Regular Long Distance Practice Hikes – Time on Feet
- Train for Uphills and Downhills
- Cross Train and Strength Train
- Focus on proper hiking form, posture, stability, and mechanics
- Practice Pace
If you are feeling a little overwhelmed at this point, and not sure exactly how to develop a Rim to Rim training plan and calendar, good news! There are a few ways I can support you with this. I mention these options below because I feel strongly that developing and sticking to a training calendar is CRUCIAL to your success on a Rim to Rim hike, no matter how you develop that training calendar. Don’t ever forget, the Grand Canyon is a lethal environment, and hiking across it needs to be taken very seriously!
Ways to Help Develop a Rim to Rim Training Plan and Calendar:
- #1: Visit this sister guide to 1st Timers Guide to Hiking the Rim to Rim in One Day. It addresses everything you need to plan your Rim to Rim in logical, sequential order – from determining your route, best time of year, handling logistics like transportation and lodging, tested and proven gear recommendations, and full trail reports on all 3 corridor trails in Grand Canyon National Park that can be used for the Rim to Rim hike.
- #2: Receive 1:1 Coaching. I offer 1:1 coaching services, and part of that package includes developing a detailed Rim to Rim training calendar, together! This training calendar will breakdown all your weekly practice hikes, in increasing increments, plus all your cross training and strength training days and rest days. It will completely take the guesswork out of developing a training calendar. Plus, there are other bonuses to receiving 1:1 coaching, as you can see in the snapshot below. You can fill out this INTEREST FORM to get started.

- #3: Consult. If you aren’t up for a full 16 week coaching package, take advantage of a quick, 30 minute consult to discuss the basics of preparing for a Rim to Rim hike in one day, including how to train, as well as determining if you are currently ready to execute your Rim to Rim hike. You can fill out this INTEREST FORM to get started.
*To take advantage of 1:1 Coaching or 30 Minute Consults, you can fill out this
- #4: Looking for a simple, straightforward guidebook to your 1st Rim to Rim hike, including training? The R2R Visual Guidebook for 1st Timers covers it all – more than 30 pages of straight to the point, downloadable, clickable resources to help you with all the prep of your 1st Rim to Rim hike! Including trail overviews, CLICKABLE gear, snacks, and supplement checklists, CLICKABLE lists of helpful websites and #’s for R2R logistics planning, trail maps and routes, training calendars, customizable R2R strength training workout, sample itineraries for both North to South and South to North routes, plus much more! All the basic info you need all in ONE PLACE! This visual guidebook will get you started off on the right foot while saving you hours of sorting through online info – GRAB YOURS HERE!

HEAT Training for the Rim to Rim
I mentioned earlier that there are 4 main ELEMENTS I focus on when training for a Rim to Rim hike:
- Distance
- Elevation Gain and Loss
- Heat
- Pace
We’ve talked about all but 1 of these – the HEAT. Knowing how to handle the heat is just as important as knowing how to handle the elevation gain or distance. Because it is an ever present threat, even in October. As you are preparing for your Rim to Rim hike and getting familiar with the trails, one way to help prepare for Grand Canyon specific training is to be aware of where the hottest and most exposed sections are:
- The Box – located between Ribbon Falls / Cottonwood Campground and Phantom Ranch on the North Kaibab Trail
- Devil’s Corkscrew – located between River Resthouse and Havasupai Gardens Campground on the Bright Angel Trail
Again, my 1st Timers Guide to Hiking the Rim to Rim in One Day goes into more detail into these such landmarks.
In addition to knowledge of the trails, there are several others ways you can prepare for the heat in Grand Canyon:
- Timing – One strategy that is helpful is to plan on getting through “the Box” by 10 am, before the temperatures in the inner canyon begin to rise and you lose the shade from the canyon walls. Starting early from the North Kaibab Trail, hiking North to South, is a good plan to accomplish this. It’s one of the several reasons I recommend a North to South hike specifically for 1st timers.
- Pacing – training to ensure an adequate pace that allows you to clear the hottest sections early and within a safe timeframe.
- Heat Acclimation – doing training hikes and workouts in the heat (safely), or using other methods such as a sauna to heat acclimate. For more background – There’s no way around it, you will likely experience some stretches of scorching temperatures while hiking the Rim to Rim. There are ways to mitigate the heat, but don’t count on escaping it or think you’ll get lucky and catch the Grand Canyon on a “cold” day. You will face the heat, and it is better if you are not facing it for the first time on the day of your hike. Since my first timers recommendation is to attempt this hike in October, before the North Rim closes and while the Grand Canyon is experiencing “cooler” temps than summer, that means that your 4 months of training will naturally take place smack over the summer season. I am not recommending that you place yourself in a dangerous situation on a regular basis while training, but it is a good idea to responsibly take on some hot workouts. Just like everything else in training, do it gradually in increments and slowly work up. And of course, it should go without saying that you need to prepare for this type of training by bringing plenty of water, salty snacks, electrolytes and sodium, the right moisture wicking and breathable clothing, and sun protection.
- Environmental Protection – the basics like sunscreen, hats, sunglasses, sun shirts, etc.
- Cooling Methods – drenching yourself in the streams found along the Rim to Rim. For this particular strategy, it can be beneficial to wear cotton as it helps with evaporative cooling and holds that cool from the stream water longer, thus lowering your core temperature. Cooling towels can also be used.
- Fabrics – your choice of fabrics can help keep you cool. Don’t wear black. Don’t go bulky or heavy. Keep it lightweight, breathable, and light colored. Cotton is something to consider for soaking in streams.
- Water Sources – there are more water sources along the Rim to Rim route than you would expect. I would advise taking advantage of them, especially when it is warmer. Soak your shirt, hat, cooling towel, etc, in every stream you can. These water sources along the trail can also prove useful as backup drinking water sources, as long as you are carrying a water filter.
- Electrolyte / Sodium Replacement – I don’t recommend hiking a Rim to Rim with just plain water only. You need to monitor and balance your electrolyte and sodium levels and their replacement. This can be done a handful of ways, and often it’s best to combine a few of these ways. You should include salty snacks like pretzels, chips, jerky, etc. And electrolytes come in many different forms – from powder mixes like Tailwind, LMNT, and Liquid IV, to Nuun tablets, to Gatorade and Gatorade packets, to electrolyte chews and tablets. I also like to utilize simple salt sticks personally. Figure out what works for you during your training hikes. This is not a “one size fits all”. I do provide a checklist of common electrolyte and sodium sources on all my coaching services.
 There’s plenty of sun and exposure on the Rim to Rim hike!
Here’s where I’ll point out the importance of REPLICATION! While you are doing your weekly training hikes, make sure to prepare and practice as you would on the day of your Rim to Rim hike. Bring the day pack you plan to use on the Rim to Rim hike, have your water system, eat the foods you plan to eat, wear the clothes you plan to wear, etc. Test out what dinners the night before and breakfasts the morning of perform best for you on your long training hikes. Never try anything new on the morning of your Rim to Rim!

The Weeks Before Your Rim to Rim Hike
You’re in your groove with training, and now it’s the final few weeks before your Rim to Rim hike. You’re about to begin your taper, but your training isn’t quite over. There’s still the taper and the nutrition training to focus on.
- Taper
- Healthy Carb Load and Nutrition
Now that your training is complete and you’ve accomplished that final long training hike, start your taper. The taper should occur 2 – 3 weeks out from your intended Rim to Rim. What does a taper period look like?
Once you start your taper, you should begin to ease off the VOLUME of hiking mileage. 25% less 3 weeks out, 50% less 2 weeks out, 75% less 1 week out. Sometimes tapers can vary between 2-3 weeks, but the VOLUME should decrease in a similar fashion.
During the taper, keep hiking and working out at the same INTENSITY, but no more than what you have previously been training at. Do not try to increase your pace. Keep the intensity the same, while decreasing the volume.
A taper helps you recover by:
- Reducing muscle fatigue and wear and tear from months of intense training
- Replenishing fuel stores levels like glycogen and carbohydrates
- Re-energizing your body before the big day
- Overall improving performance
WHY is the taper important?
- After months of training and putting on miles, it’s completely natural that your muscles are going to feel some wear and tear. A taper allows your body to repair any muscle and tissue damage, thus making you stronger!
- Your carb stores will also be depleted from these months of intense training, so a taper allows you to replenish those carb levels right before it matters the most. In addition to carbs, the taper restores antioxidants, hormones, and metabolic enzymes as well. A taper essentially provides you with more energy to rely on during the big day.
- Another reason to taper is that at this point in your training plan, further training won’t provide much benefit. Once you’ve built up your fitness and stamina to a certain level, there’s not a huge amount more you can do to enhance those levels in just another week or two. What you can do, though, is deplete energy, prevent recovery, or possibly injure yourself unnecessarily – all from not following a taper period. And if you are worried about your stamina and fitness levels declining by easing off, it won’t happen that quickly!
- The taper helps you prevent the fatigue that is so common at the end of an intense training period. This is where the term “burnout” comes from. Not only does the taper replenish physical strength, but also mental strength as well. Because burnout can plague both the mind and the body.
- Finally, studies have proven that tapering correctly can enhance performance considerably. Studies have also shown that continuing to train hard at the same levels right up until the big day can destroy your performance on that big race or hike.
You can read more about 6 Tips to Taper Correctly here.
During the taper period, don’t forget to stretch plenty and use a foam roller when able, as well as continue to cross train and strength train. In the last few days before your Rim to Rim, you should ease up on all workouts, with nothing more than maybe a short, easy walk to loosen your legs the day or two before your Rim to Rim. You’ll see this demonstrated on the free Rim to Rim training calendar I’ve provided.
While you may be easing up on some of the intense training this final taper, you should kick your nutrition into higher gear! Hopefully throughout your months long training period you have been fueling your body with the right types of food, but the final week(s) it is especially important, as your body will be counting on every ounce of energy store it has available to it.
Even a couple weeks out, I choose to start focusing more on nutrition and fueling. I’m not saying I get ultra strict about what I eat, but I just try to be more intentional about making sure everything has some purpose. This can even be a simple example like wanting to snack at night while I’m watching a movie. Instead of reaching for the bag of empty calorie chips, I might make my myself a bowl of yogurt with granola.
During that final week, make sure to be intentional about what you eat, and take advantage of plenty of good carbs and whole grains. Get in some lean protein sources regularly, and drink plenty of water consistently. Consider avoiding alcohol and sugar.
The Day Before the Rim to Rim Hike
- Healthy Carb Load
- Hydrate
- Check Gear
- Lay Out Gear/Clothes
- Stretch
- Rest
- Check NPS Website for Last Minute Alerts
- Check the Weather
- Let Someone Know Your Plans (you can use a “Hiking Safety Contact Form” like this one to leave in your glovebox or console).
- Trim Your Toenails
Continue loading up on healthy carbs the day and night before your hike. My favorite pre hike meals are hamburgers with fries / spaghetti with whole grain bread / pizza. Don’t worry about your “last meal” being “healthy” necessarily. Once again, know what has worked well for you in the past in terms of what you ate before a long hike that performed well. Drink plenty of water. Cut out alcohol and sugar. Have all your laundry washed and lay out every article of clothing and gear you need for the following morning. Check your gear, make sure everything works. Do some stretches. Take it easy on your feet and rest. Download maps to your phone if you want them.
Make sure to let someone know at this point what your plans are. Provide the name of the trails, your anticipated start and finish time, and who they can contact in case of an emergency. Check the Grand Canyon National Park’s website for any last minute notices. Occasionally, water line breaks or other issues come up that might affect your plans. Alerts like these will be posted on the National Park website.
And check the weather! The Grand Canyon may appear like it is always a desert type environment, but snow, sleet, and rain do sometimes start making appearances this time of year. In fact, a tornado touched down in the town of Williams not days after one of my October Rim to Rim hikes in Grand Canyon, and that storm brought plenty of surprise weather to Grand Canyon as well. If the weather necessitates any last minute changes to your gear and layers, do it!
You can check the NPS weather and road conditions HERE, and get an updated forecast for Grand Canyon HERE.
Check here for Phantom Ranch specific forecasts.
The Morning of the Rim to Rim Hike
- Healthy Breakfast of Carbs, Protein, and Energy
- Final Gear Check
Eat a carb, protein, and energy heavy meal that is easily digestible for breakfast. My go to breakfast for every long hike, run, or biking event I have ever completed is a bagel or English Muffin with peanut butter, a banana, oatmeal, and applesauce. And water of course!
MORE: Check out why peanut butter is the ultimate power food!
Do one final check on your gear! In particular, test and make sure that if you are using a water hydration bladder, that there are no leaks. Invert it to make sure there are no leaks near the top either. Make sure that you are on schedule to start your Rim to Rim hike early! I like to recommend no later than 6 am, but 4 am or 5 am are often more ideal, especially on hotter days.
Final Thoughts on Rim to Rim Training
#1: Listen to Your Body – This point is personally a tough one for me. I have a lot of confidence in my abilities, and it is hard for me to acknowledge when my body is telling me to give it a break. Your mental mindset will be tempted to overpower your internal body’s voice, and tell you that little twinge of pain you feel is no big deal and you can power through it. But in these cases, it is best to listen to your body.
You can always come back from a botched training hike that didn’t go as intended, but you cannot always come back from an injury. Know that you WILL have bad training days during your Rim to Rim training, and often you won’t even know why. The stars just won’t align some days, but it won’t be the end of the world. Keep the big picture in mind on those days.
It’s important to note the difference between listening to your body over minor things like over – exhaustion or soreness, or simply having an off day, and an actual injury. If you know in your gut that you likely may have an injury, do NOT push through it or continue to train. Seek professional medical assistance before continuing.
#2: Mix It Up – fight burnout by mixing it up. Vary your trails, your routes, or even check out a destination trail if you can. Hike with friends sometimes, hike solo sometimes. Do a night hike and get used to hiking with a headlamp (good to practice anyways if you’re planning a pre-dawn start for your Rim to Rim).
Now you’re fully knowledgeable on all things Rim to Rim training, and ready to develop and execute a plan!
>MORE: Check out my entire collection of all things active travel, including R2R training resources! Get all the training calendars, checklists, trackers, and handy printables you will need to tackle any of your active travel goals!
How Much Would 4 Months of Accountability and Coaching Mean to You?
Did you know that I offer 1:1 Coaching for the R2R hike?
Need Expert Assessment on Whether You Are Ready for Your R2R Hike?
Take a look, and COMPLETE THIS INTEREST FORM to get started today!
Additional Grand Canyon Hiking Resources:
- 1st Timers Guide to Hiking the Rim to Rim in One Day
- 16 Week Rim to Rim Training Calendar PDF
- 1:1 Rim to Rim Coaching Plans and Consults
- The Rim to Rim VISUAL GUIDEBOOK for 1st Timers
- Rim to Rim Packing List
- Rim to Rim Gear Checklist PDF
- How to Hike Rim to River in One Day
Have you completed a Rim to Rim hike at the Grand Canyon? I would love to hear about your experience and any tips you picked up from your trek!
Curious how a native Texan like myself trained for a hike like the Grand Canyon Rim to Rim hike? Part of my training involved this at home “choose your own path” customizable strength training workout! It’s simple, straightforward, targeted, and can be done from anywhere!
And don’t forget to snag this example 16 week Rim to Rim TRAINING CALENDAR!

***You’re now ready to start training for a Rim to Rim! Don’t forget to also get acquainted with the full trail report of the Rim to Rim hike!
PIN for LATER!


Thanks for sharing this! My husband and I with a group of people are planning on hiking GC in May 2022 and this post has been very helpful! We are marathoners but relatively new to long-haul hiking!
Hey Sheila,
Your marathon background will come in super handy with hiking the Grand Canyon Rim to Rim! My running background absolutely helped me, because pacing and efficient speed are very beneficial. Not to mention, running marathons is about the same length as hiking the Rim to Rim, so you will be very used to this type of long distance, all day challenge. And I imagine you are probably already very familiar with adequate fueling, and how to listen to your body’s cues over long distances and lots of exertion. All this is going to help you so much! Just don’t underestimate the environmental factors in May, and make sure to cater your gear list to Grand Canyon friendly specific gear 🙂
I’m aware that people traditionally recommend the Rim to Rim early or late season (e.g. May-June or Oct) due to the punishing temperatures in the summer. How common is it to hike at night by headlamp to avoid temperatures during the summer months? Mountain biking at night has become commonplace due to high-intensity LEDs. I have an opportunity to train for a Rim-to-Rim in August and am thinking of trying to plan it such that I would reach Phantom Ranch by 5 or 6 a.m.?
Good afternoon, your planning guide is very helpful. I have a couple questions. we are from out of town, should we leave our car at the south rim and shuttle to start at the north rim or leave our car at the north rim and shuttle back to it? Im worried about missing some detail and being miles from the trailhead, my car or the hotel?
awesome info. I am starting the planning process for my first rim-to-rim hike. This was extremely helpful.
Good to hear Steve, best of luck in the planning process for your hike!