4 Day Itinerary for the Kings Peak Hike: Highest Point in Utah
A whole century before I was born, the High Uintas Wilderness and its 453,860 acres was designated and named after the modern day Ute Tribe. Kings Peak Utah, reigns over this mountain range as the highest point in Utah. Located in the far northeastern corner of the state, this has to be one of the most unadulterated and rugged mountain ranges I have ever experienced. Once you are immersed, you will feel a world away from any human fingerprint. The best way to experience all of the basins, rivers, valleys, and mountains of the Uintas is by conquering the Kings Peak hike, from its humble beginnings at the Henrys Fork Trailhead and River, to its towering summit overlooking the entire state!

Disclosure: Below are some affiliate links-these are all products I highly recommend. I won’t make any recommendations on this page that I haven’t tested or personally used! Enjoy this guide to the Kings Peak hike in Utah!
Table of Contents
Guide to the Kings Peak Hike in Utah
My reason for hiking Kings Peak was to achieve a goal of reaching the the highest point in Utah, in my quest to conquer all 50 state high points in the US! I’m currently sitting at 45 completed, but Kings Peak was one of my first high points! While many people I like to refer to as “crazy” have completed this hike in one day, I am going to present my itinerary as a 4 day hike. Why not savor the experience of hiking to the highest point in Utah for as long as possible?
This guide to the Kings Peak hike will cover the following:
- Location of the Kings Peak Hike
- Overview of the Kings Peak Hike
- Tips for Hiking Kings Peak
- Logistics and Itinerary Breakdown By Day
- Gear Recommendations for the Kings Peak Hike
- Full Trail Report on Kings Peak Utah
***Note: if you know yourself well enough that you know you are capable of 25 miles in one day, then this is a doable one day hike/trail run. I encountered trail runners doing this hike in one day, and after several experiences myself of long distance hikes like the Grand Canyon’s Rim to Rim hike, or the 21 mile long Mt. Whitney hike in California, I believe I am capable as well of completing Kings Peak in a day. However, for the average hiker, I will continue to present this hike as a preferred multi day backpacking experience. If you are experienced, you can take the information here and use it to hike Kings Peak in a day as well.
If you have ever researched “high-pointing” in the United States, it won’t be long before you realize that the vast majority of state high points can be reached in only a day’s hike. In fact, there are only 5 summits I would truly consider overnight or multi-day treks. The Kings Peak hike is one of those 5 high points, and I don’t regret the decision to extend the hike in this diverse area for as long as possible.
Location of Kings Peak Utah
Kings Peak is the highest point in Utah and in the Uintas mountain range, situated in the northeastern corner of the state, just south of Mountain View, Wyoming. In fact, the most direct way to the trailhead actually requires driving north from Utah into Wyoming, then driving back south into Utah and the High Uintas Wilderness of the Wasatch National Forest. The trailhead for Kings Peak is located at the Henry’s Fork Trailhead, in the Henry’s Fork Campground.
Location of Kings Peak Utah and the trailhead of the Kings Peak hike at Henry’s Fork Trailhead
CLOSEST AIRPORT(S):
The closest major airport and major city to Kings Peak is Salt Lake City. If you are flying, you will want to check into flights to and from Salt Lake City. It is about a 3 hour drive from Salt Lake City to the Henry’s Fork Trailhead and the start of the Kings Peak hike.
CLOSEST TOWN(S):
- Mountain View, WY to Henrys Fork Trailhead: 1 hour
- Evanston, WY to Henrys Fork Trailhead: 1 hour and 30 minutes
- Salt Lake City to Henrys Fork Trailhead: 2 hours and 45 minutes
Quick Facts On the Kings Peak Hike:
Length: 25 miles roundtrip out and back
Rating: Difficult
Highest Elevation: 13,528 feet
Elevation Gain: 4,202 feet
Fees/Permits: there are no fees or permits required for the Kings Peak hike
Parking and Facilities: there is ample parking and bathroom facilities at the Henrys Fork Trailhead
Conquering the Kings Peak hike is best accomplished as a multi-day backpacking trip (IF you know yourself well enough and have plenty of experience with 20+ mile long day hikes, it is doable as a day hike / trail run). That means you need to take extra precautions and additional preparations in order to be successful and have a safe summit of Kings Peak Utah. Here’s quick overview before we dive into the specific itinerary details and trail report for hiking to the highest point in Utah.
Camping Availability Near Kings Peak Utah:
There are several reservable and first-come-first-serve campgrounds in the Wasatch National Forest. You can visit the Forest Service website for the Uinta-Wasatch-Cache National Forest for more details on all available campground camping. For reservable campsites, I recommend the Stateline Campground. This campground is a ideal jumping off spot for camping the night before embarking on the Kings Peak hike on the Henrys Fork trailhead. It is about a 40 minute drive from the Stateline Campground to the Henrys Fork Trailhead for the Kings Peak hike.
***Note: the Henrys Fork Campground (no camping fees / primitive) is actually the closest campground to the Henrys Fork Trailhead, immediately adjacent to the trailhead, BUT it is first come first serve, and so you are going to be taking a gamble unless you are planning to arrive early. If you don’t want to take a risk, Stateline Campground is the closest reservable spot.
Stateline Campground to the Henry’s Fork Trailhead
Length of the Kings Peak Hike:
25 miles out and back. This hike can be done in one day, but I will be breaking it down into 4 days.
Read More: Curious what an out and back trail is exactly?
Elevation at the Summit of Kings Peak Utah:
13,527 feet, making it the 7th highest state high point in the United States.
Read More: Check out where all 50 U.S. state high points rank HERE!
Elevation Gain Along the Kings Peak Hike:
4,202 feet in elevation gain from the Henry’s Fork trailhead to the summit of Kings Peak.

Rating of the Kings Peak Hike:
This hike to the highest point in Utah encompasses all ranges of difficulty. There are sections of gentle elevation gain, and sections of serious steepness. The summit is non-technical but nerve-wracking off trail boulder hopping within the last mile, and this hike is at high altitude. It is also a long distance hike considered best accomplished over the course of several days, which naturally ups the difficulty rating of the Kings Peak hike. I would rate it as a whole as difficult.
Dog Friendliness of the Kings Peak Hike:
Yes, to the degree that you are comfortable having your companion with you for this extended amount of time. Also, I would only recommend this hike for dogs that have experience with rocky terrain and boulder hopping, long distances, and who have had a chance to toughen up their paws for rough, uneven surfaces. I did encounter a duo of fellow hikers who summited Kings Peak with their furry companion, and he was loving every minute of it!
Gear Recommendations for the Highest Point in Utah:
This is a multi day backpacking hike and therefore requires backpacking gear. You will need all the essential 10 categories of backpacking components – backpack, tent, sleeping bag, sleeping pad, stove, water filtration system, food, and clothing, including a pair of reliable hiking boots or trail runners, plus additional secondary items of gear!
Gear Recommendation Quick Links:
- Backpack
- Hubba Hubba Lightweight Backpacking Tent
- 3 Season Lightweight Sleeping Bag
- Tent Footprint
- Lightweight Sleeping Pad
- Hiking Boots and/or Trail Runners
- Water Hydration Bladder
- Lifestraw Water Bottle
- Lifestraw Personal Filter
- Water Purification Tablets
- Waterproof Outer Shell Jacket
- Merino Wool Base Layer
- Columbia Hiking Pants
- Anti Blister “Twin Skin” Socks
- Wool Hiking Socks
- Cuffed Beanie and/or Buff
- Waterproof Gloves
- Compass
- First Aid Kit
- Blister Protection
- Garmin In Reach
- Signaling Mirror / Whistle Combo
- Bear Spray and Bear Canister
- Emergency Tent / Emergency Blanket / SOL Bivy
- Dehydrated Meals / Snacks
- Sandwich
- Beef Jerky
- Trail Mix / Nuts
- Tuna Packets
- Applesauce Pouches
- Squeezable Peanut Butter
- Honey Stinger Waffles
- GU Energy Gels
- Banana
- Carrots
- RX Bars
- NUUN Tablets / Electrolytes
- Portable Hiking Stove and Propane
- Lighter / Firestarter / Match Kit / Vaseline and Cotton Balls
- Tin Cup and Spork
- Toiletries / Hand Sanitizer / Wipes / Anti Chafing Balm
- Sunscreen and Bug Spray
- Knife / Multi Use Tool
- Compression Sack
- Duct Tape / Gear Aid
- Head Lamp
- Trekking Poles

Grab Your Own Downloadable Backpacking Essentials Checklist HERE!
Tips for Hiking Kings Peak Utah
#1: Know where you are camping ahead of time – there are multiple campgrounds available in the Uinta – Wasatch National Forest near the Henrys Fork Trailhead, but some are reservable, and some are first come first serve. I opted for a reservable site at the Stateline Campground, approximately 40 minutes from the trailhead, because I was arriving on a Saturday in the summer. The closest campground to the Henry Fork Trailhead is the adjacent Henry Fork Campground, but it is first come first serve.
#2: Let someone know your plans – make sure someone (outside of your hiking party) knows your intended plans. Make sure an emergency contact family or friend knows:
- your camping and hiking locations throughout your itinerary
- your intended timeframes, including arrivals and departures
- emergency contact information for the National Forest (you can find office numbers for the ranger stations in this National Forest here)
- you can use a Wilderness Emergency Contact Form like this one, and leave it in your console or glove box in case of an emergency, to help expedite rescue services
#3: Be prepared – physically, mentally, and with the right gear. This is a long, tough hike, so make sure that you are physically able to complete it. Have a solid hiking base in place before attempting this hike, including previous backpacking, long distance, high altitude, and hefty elevation gain hikes. Also have all the necessary backpacking gear for this hike.
#4: Stock up in Salt Lake City – there are few amenities between Salt Lake City and Kings Peak. Smaller towns in Wyoming, like Evanston and Mountain View, will have some restaurants and gas stations, but when it comes to needing to buy gear and such, make sure to do that in Salt Lake City if you need to.
#5: Pay attention – portions of the Kings Peak hike demand your attention. There are portions that are “off trail” near the summit, where the official trail is harder to find, and the final push involves some minor rock scrambling. Then there’s the open basins and barren faces along the trail, where it is easier to lose the path.
#6: Bring a backup water filter – this should be a part of your backpacking checklist anyways, but make sure to have a way to filter water on this hike. An ideal location is Dollar Lake, the recommended camping location for Nights 2 and 3.
#7: Be wildlife aware – this includes moose, bears, and other smaller mammals and predators.
#8: Follow Leave No Trace – pack it in, pack it out
4 Day Itinerary for the Kings Peak Hike
The following itinerary follows a 4 day backpacking schedule, and includes how much mileage to log each day, and where to camp at night. You can also save or pin the handy graphic below.
Route of the Kings Peak hike from the Henrys Fork Trailhead to the summit

Day 1: Depart Salt Lake City and Camp at Stateline Campground
If you are flying into Utah for the Kings Peak hike, your airport will more than likely be Salt Lake City. Salt Lake City is also the nearest large city with ample lodging and accommodations. If you are needing to stock up on any gear, you won’t find a better option any closer to Kings Peak, so do your shopping also in Salt Lake City. Our group choose to meet in Salt Lake City before heading out on day 1 of the hike, in order to make meeting up and getting organized easier on us. It is an approximate 2 hours and 30 minute drive from Salt Lake City to the Stateline Campground (or 3 hours from Salt Lake City to the Henrys Fork Campground – Stateline Campground is reservable but a ~ 40 minute drive to the trailhead / Henrys Fork Campground is next to the trailhead but is first come first serve).
Our approach arriving to Kings Peak Utah was from Salt Lake City, with one last stop in the town of Mountain View, Wyoming, before reaching the forest. This small town is about 30 minutes from the cluster of campgrounds in the Wasatch National Forest, including my recommended campground of Stateline Campground. Mountain View is a good place to stop for gas and food and small items. If you require any specialty items, be sure to get them in one of the bigger cities in the vicinity, such as Salt Lake City.
Departing Mountain View, Wyoming, and heading south, you will be greeted with wide open expanses that stretch for miles, until they terminate on the horizon at the foot of the Uintas range and the looming Kings Peak Utah. Taking in the massiveness of Kings Peak for that 30ish minute drive in is quite exhilarating, yet intimidating, trust me!
While the Henrys Fork Campground is actually at the Henrys Fork Trailhead, we opted to go with the Stateline Campground, approximately 40 minutes away from the Henrys Fork Trailhead. The reason being that Stateline Campground is reservable, whereas Henrys Fork Campground is first-come-first-serve, as were the other campgrounds in the immediate area. Arriving on a Saturday, we felt it was better to have a reserved campsite at Stateline Campground versus chancing it at one of the other nearby first come first serve sites.

Stateline Campground gets its moniker from the fact that it literally sits on the border of Wyoming and Utah. I was quite pleased with this decision to stay here, as the Stateline Campground feels very removed and secluded, and had an aura of calm and quiet.
The campground sits on the edge of Stateline Reservoir, stocked with fish who were literally jumping out of the water begging to be caught. There are bathrooms and water, and the sites are very well maintained. The area was recently devastated by a beetle infestation that required many of the resident trees to be chopped down, so there is a little less canopy than previous years.
Night 1 was spent at Stateline Campground resting and prepping for the hike in the following morning, and some easy walks around the reservoir to watch the sunset ablaze.

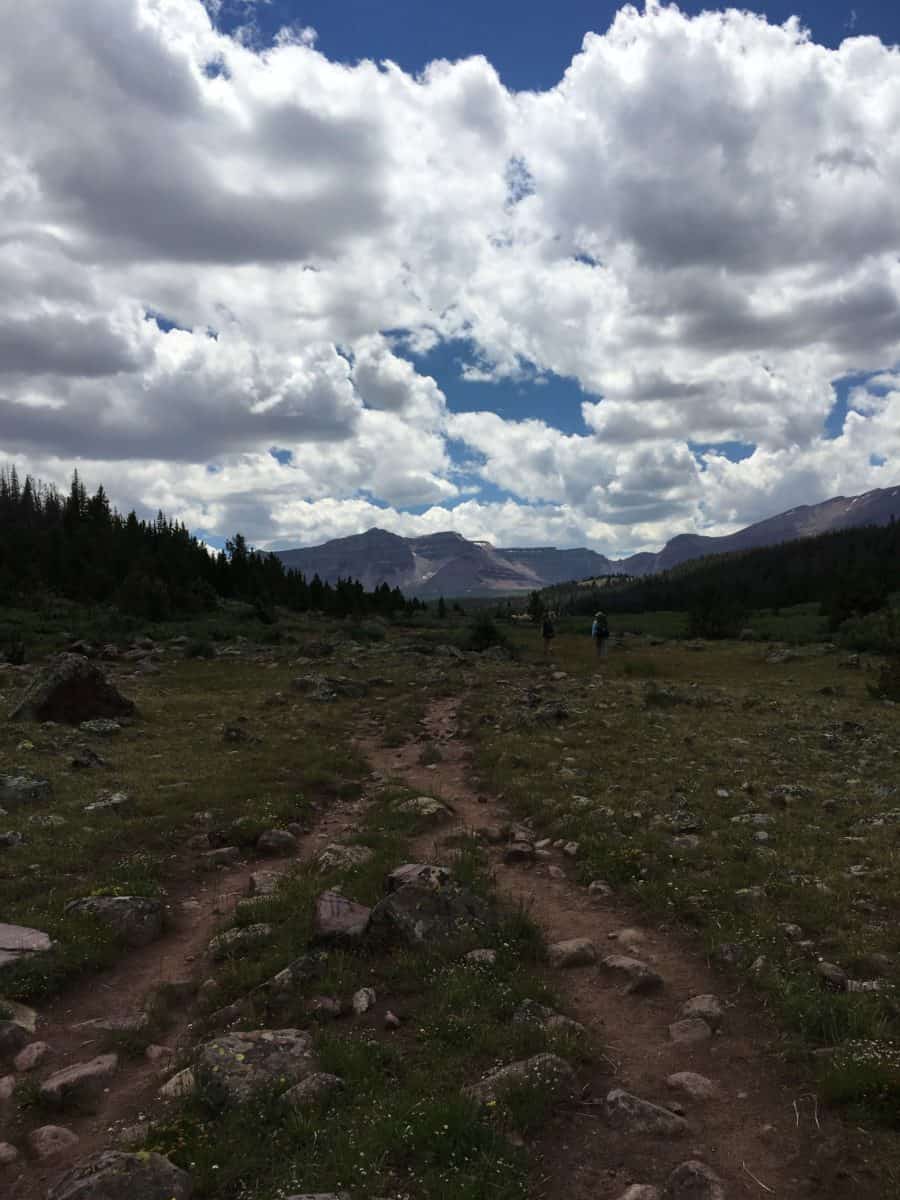
Day 2: Henrys Fork Trailhead to Dollar Lake
Approximate Total Mileage: 7 miles
With Day 2 begins the real backpacking and hiking. It is about a 40 minute drive from Stateline Campground to the Henrys Fork Trailhead, the beginning of the Kings Peak hike. There are bathroom facilities and ample room to park, albeit it may have to be grass parking on busy summer weekends. With all required gear, we began our approximate 7 mile backpacking trek in from the Henrys Fork Trailhead to Dollar Lake, our chosen overnight primitive camping spot for Night 2.
The trail of the Kings Peak hike starts off hugging the river to the left, providing pleasant background noise and some stunning overlooks. At several points, the river crosses several small spill offs and small cascading rapids, and is visible from cliffs along the trail above.


The first several miles are easy on the steepness, climbing less than 500 feet in elevation gain in the first 3 miles. There is dappled forest canopy and easy to manage footing along the path. Although this is what I would consider to be the “easier” part of the hike, it is still necessary to take precautions as even this part of the hike is already at 10,000 feet in elevation, and altitude sickness is a very real threat. Take regular water and rest breaks, and be sure to fuel with food.
***Insider Tip: What snacks do I pack for a long day hike? Take a peek below:
- Sandwich
- Beef Jerky
- Trail Mix / Nuts
- Tuna Packets
- Applesauce Pouches
- Squeezable Peanut Butter Packets
- Honey Stinger Waffles
- GU Energy Gels
- Banana
- Carrots
- RX Bars
- NUUN Tablets / Electrolytes

Around 5.5 miles in, you will turn to the left and cross the log and rope bridge over Elkhorn Stream. This may end up being the most technically challenging part of the Day 2 hike, as you navigate across a narrow log bridge with a single rope railing on one side, all while balancing what may be 30 plus pounds (or more) on your back!
After the Elkhorn crossing, there are only a couple more miles until you hit about 7 miles in and reach the Dollar Lake backcountry “campground”. This lake is just slightly off the main path to the left.
While Dollar Lake does not have any officially designated campsites and is strictly backcountry, it is considered a suitable “campground” location for most hikers undertaking a multi-day trek to Kings Peak. Dollar Lake is also a good spot to camp for Night 2 as you can take advantage of the plentiful water source for refilling purposes, and be perfectly situated to push for the summit of Kings Peak Utah on Day 3.
After investigating the area immediately surrounding Dollar Lake, it became clear that this is a popular watering hole for wildlife at night, so try and stay clear of any obvious “deer” paths leading to the waters edge. Chipmunks are overflowing here, so closely guard all food, and secure any equipment. Chipmunks have been known to gnaw through backpacks to get to food inside, so it may be worth removing all food from inside your gear and storing it alternatively. There are hordes of mosquitoes constantly hovering near the stillness of Dollar Lake – bug spray is a must! Bears are also a reality here, and so some form of bear canister or hoisted bear bag is also necessary. There are no facilities here, and all campers must closely follow the “pack it in, pack it out” guidelines.
We only observed one other camper that night at Dollar Lake. It is very serene and still and isolated, except for the lone moose that we spotted at the water’s edge early on the morning of Day 3 as we prepped our oatmeal breakfast before heading out for the summit of Kings Peak!
Day 3: Summiting Kings Peak Utah
Approximate Total Mileage: 11 miles
The advantage to camping at Dollar Lake on Night 2 and summiting on Day 3, is that you can leave all your heavy gear at the campsite for the day while you summit Kings Peak. This was a welcome relief to me after 7 miles the previous day with 30 pounds attached to my back. Just be sure to bring a smaller summiting day pack when you pack in advance for Day 3 and the summit push.
After leaving Dollar Lake, you will find yourself quickly out from the tree line, and traversing a large basin speckled with crystal blue ponds and bordered on both side by the Uinta mountain range. After several miles, the range converges into Gunsight Pass, and a quick jaunt up in elevation as you round the switchbacks up to the Pass.


Once at the top of Gunsight Pass, you will be greeted by a large cairn, and sweeping views of yet another, even larger basin, named Painter’s Basin, leading to the base of Kings Peak. At this point you will be closing in on 12,000 feet in elevation. The quick elevation gain acquired by rounding Gunsight Pass is ironically almost immediately lost coming down into the Painter’s Basin.
From Gunsight Pass, it is approximately 4 miles to the summit. After passing through Painter’s Basin, the final push up to Kings Peak begins by climbing another mountain pass, this time Anderson Pass, sitting at 12,800 feet in elevation. Anderson Pass is much more desolate and bare than the basin below, and it is clear that the elevation and elements take its toll on life here. As the vegetation thins out and becomes more bare and rocky, the trail also becomes harder to distinguish. This is where hiking mistakes can easily rear their ugly head in the form of losing the trail, if you are not paying close attention!
Anderson Pass is a strenuous hike up and quickly gains elevation, until you reach the saddle at the very base of the summit of Kings Peak. Here the “official” trail terminates, and for the last mile and a half or so to the summit, hikers are basically “off roading” it. The last push to the summit consists of hoisting oneself over large rocks and boulders, and although it does not require any technical climbing or gear, it is boulder hopping on a pathless path, and requires extremely careful and intentional footing and pacing. Weather, rain, mist, it is all common at this elevation, and care has to be exercised when crossing the often slippery surfaces of these boulders. Take your time on this boulder portion to the summit. It will go slower than you think from looking at it from afar.


The Summit of Kings Peak utah
The views from the summit of Kings Peak are simply rugged. There is zero trace of any human fingerprint from this vantage point. The Uintas are clearly as wild and unfiltered as they appear to be even from their lowest point. While the summit of Kings is barren, desolate, forlorn, and cold, its views are anything but.
The descent from the summit is arguable just as precarious as the ascent. Balancing on rocks, finding the trail amidst the barren landscape, distinguishing between the “human” trail and numerous “deer” paths, all require careful attention to detail. Remember, that mile and a half or so of no distinguished trail is something to pay special heed to as you descend, until you once again pick up the trail below the summit, and return back to Dollar Lake the way you came in. All in all, it is about 11 miles roundtrip from the Dollar Lake “campground”, to the summit of Kings Peak, and back down to Dollar Lake again and your camp. Night 3 will be spent camping again at Dollar Lake.
Day 4: Finish the Kings Peak Hike
Estimated Total Mileage: 7 miles
Day 4 is for breaking down your camp at Dollar Lake in the morning, loading packs up, and hiking back out the 7ish miles from the Dollar Lake backcountry campsite to the Henry’s Fork Trailhead. At this point, depart the Uintas, or camp another night and celebrate!

Recommendations for the Kings Peak Hike:
Hiking Kings Peak is not an endeavor you should just do on a whim. Take the time to invest in the backpacking gear that is necessary to make this hike safe and responsible. Remember, you can check out all the backpacking essential gear you need for any backpacking trip, including the Kings Peak hike, in this sister post!
***You can also grab a printable backpacking gear checklist HERE, to make sure you don’t forget anything!
Below are a few of the backpacking basics you will need for a trip up Kings Peak Utah.
Basic Gear Recommendations for Kings Peak Utah:
Invest in high quality equipment. Being a several day backpacking hike, the worst thing would be to have malfunctioning or inadequate gear. Come prepared with the essentials for backpacking checklist – hiking boots or good trail runners, a pack, tent, three season sleeping bag, sleeping pad, clothing layers, and a water filtration system (water is plentiful here, take advantage), plus additional backpacking gear. I’ve included more detail about a few of the biggies I personally find invaluable for this hike to Kings Peak.
- Day Pack:
You certainly can hike to the summit on Day 3 with all your gear, but I would recommend bringing a smaller day pack specifically for just that day, so that you can leave camp at Dollar Lake and have a lighter load to carry to the summit. Here’s the Camelback day pack that I rely on for my day hikes.
- Backpack:
For a multi day backpacking event such as the Kings Peak hike, you will absolutely need a backpack capable of carrying all the backpacking essentials, such as a tent, sleeping bad and pad, layers, food, and water. Look at no smaller than 50 liters if you are carrying everything yourself, or you can consider slightly smaller if you are splitting the load with a partner. Check out my favorite 50L Osprey!
- Shoes and Socks:
Nothing can derail a hike quicker than not caring properly for your feet. For the Kings Peak hike, strongly consider either a sturdy hiking boot, like these Gore-tex waterproof Vasques, or a trusted, well cushioned trail runner, like these HOKA One One Speedgoats. I am a complete convert of trail runners for most long distance hikes, and I don’t hike or trail run in anything other than HOKA Speedgoats. They are the top of the line in cushioning and performance, and I can say this because I’ve learned it from doing 20+ mile day hikes in them, like the Grand Canyon’s Rim to Rim hike! And I do believe that Kings Peak is a hike that can be done in a superb trail runner like HOKAS. However, it helps to know what your preference and experience is ahead of time. If you know that trail runners are a good fit for a multi day hike similar to Kings Peak, then you can have confidence in that choice. If you know that you are better suited for a traditional hiking boot with more support, then opt for that. This hike should not be the first time you are testing out either!!! You should be completing training hikes ahead of time, including as many longer distance day and overnight hikes as possible in preparation, and that is the time to get familiar with your choice of footwear and know what you trust. As far as hiking socks go, you are going to want to go with something that is blister proof, because blisters are kryptonite for backpacking hikes! For the Kings Peak hike, just be sure to bring 2 pairs of socks! I used to fall victim to blisters constantly, until I discovered Hilly Twin Skin socks! These socks are what they sound like, made with two “skins”, which help to combat the friction that can cause blisters. I haven’t had a single blister on backpacking trips, long distance trail runs, or all day hiking events like Mt. Whitney’s 21 miles uphill in a one day!
- Tent
Your backpacking tent should always first consider weight. You need to keep weight in mind at all times when backpacking, and your tent should aim to be no more than a couple pounds in weight. Waterproof is also another big consideration. For my backpacking and camping trips, I use MSR’s Hubba Hubba NX two person tent (because there is often two people+ in my group), but MSR also makes a 1 person Hubba Hubba tent. The Hubba Hubbas are lightweight at 3 lbs, waterproof, and easy to set up, even if you are solo backpacking. They are durable and proven 3 season backpacking tents. My Hubba Hubba has gotten through the cold of Colorado, to the arid and rough terrain of Big Bend National Park, to the windy summits of the Guadalupe Mountains, to the humble state parks of Dallas/Fort Worth!
- Sleeping Bag:
This is another critical item where weight comes into play, but also has to be carefully balanced with quality and comfort. There are a lot of options out there, but my go to is the Hyke and Byke 3 season down sleeping bag. It has a water resistant coating, 650 fill down, includes a stuff sack, and weighs just over 2 lbs. You can also purchase a 4 seasons version of the Hyke and Byke sleeping bag that is rated for under 32 degrees.
- Hydration System:
When I hiked Kings Peak, I made sure that I was able to carry several liters of water with me at all given times, as well as have a back up filtration system as needed. I always feel it is best to carry sufficient water with you on your person at all times, even when that is a weight sacrifice to have to consider. Water is that crucial when hiking. I am a huge fan of this 3 liter Platypus water hydration bladder. It is wide mouthed, which makes it easy to fill, clean, and dry. It allows for on the go hydration, which is my preferred method. However, I when in the backcountry, I always make sure that I have a backup filtration system on me. This Lifestraw equipped water bottle is perfect for that purpose! The filter is built in to the bottle, so you can just fill up on the spot and go!
- Outer Shell Layer:
Don’t go backpacking without a outer layer shell! Especially in the mountains or at high altitude where afternoon showers are almost a given! So it is important to distinguish between a fully waterproof outer layer shell, and just a water resistant outer layer shell. This can make a huge, huge difference if you are caught in rain during a multi day backpacking trip, and you are relying on your outer shell to keep you and your layers underneath dry! And once again, you have to consider weight as well! It is hard to find a truly waterproof outer shell that is also lightweight and compressible, but I found the perfect blend with the ultra lightweight, fully waterproof, Outdoor Research jacket! It weighs just 5.5 ounces, compresses into itself, is hooded, and best of all, is fully waterproof! BONUS – it is also windproof for extra protection from the elements!
- Navigation:
This is one of the most untouched wildernesses I have ever been in. The trails here are also notorious for their lack of good signage, and it is easy to loose the trail in multiple spots. Be prepared, whether it is with a compass and compass reading abilities, GPS or personal emergency beacon, or both. This was the first backpacking hike that I learned about MyTopo maps, and I’ve been a believer in their brilliance and practicality ever since. Not only having access to a customized topographical map ahead of time help you prepare and do research, but it is handy to have with you en route as well. Though you shouldn’t rely 100% on it, AllTrails offline downloadable maps are also handy!
Regardless of how you go about being navigation-ally prepared, have a plan in place and pay close attention to surroundings as you hike. Be familiar with what landmarks you should pass, mileage, elevation gain, etc. ahead of time.
- Layers:
Pack for 3 seasons. Even in July, it gets down into the forties at night. Rain and thunderstorms are also very frequent visitors. Check out my layers breakdown post for winter hiking, or my complete hiking checklist that sums up how to layer for 4 seasons.
***For a complete list of all the backpacking gear you will need for Kings Peak, don’t miss out on this backpacking essentials post!
And don’t forget, you can grab a printable version of this backpacking essentials checklist HERE!
So there you have it, you are ready to take on one of the most impressive Utah peaks, and state high point hikes in the United States!
Happy Hiking!
Insider Tip: In addition to being prepared with the right equipment, take care of all your hiking safety needs with these 7 solo hiking safety tips and the top 5 hiking mistakes to avoid!
***Wanna know more about the other 50 state high points and how to hike some of my previous Southwestern state high points? Find out how to conquer Arizona’s Humphrey’s Peak, Texas’s Guadalupe Peak, and New Mexico’s Wheeler Peak!
What About the Other State High Points?
Get to know EACH of the 50 State High Points in the U.S. with this FREE graphic!
***LAST STOP! If you have hiking goals, then you want to check out this awesome collection of handy hiking printables, training calendars, resources, and hiking trackers, to help keep you organized, intentional, and prepared for all your hiking pursuits and goals!
PIN for LATER!


Amazing! Well done! I will take up the challenge at some point! Xx
Sarah I hope you do, you will not be disappointed! Utah is such an amazing state to visit, and this is my favorite spot!
I feel like Utah would be a fantastic place to take a road trip around! There are so many stunning natural landscapes and hikes, like King’s Peak, to explore.
Sarah,
I would love to go back to Utah and take a road trip through the National Parks – Zion, Bryce, Canyonlands, Capitol Reef, Escalante, not to mention that some of these are also in close proximity to Grand Canyon National Park! There’s so many amazing options!