
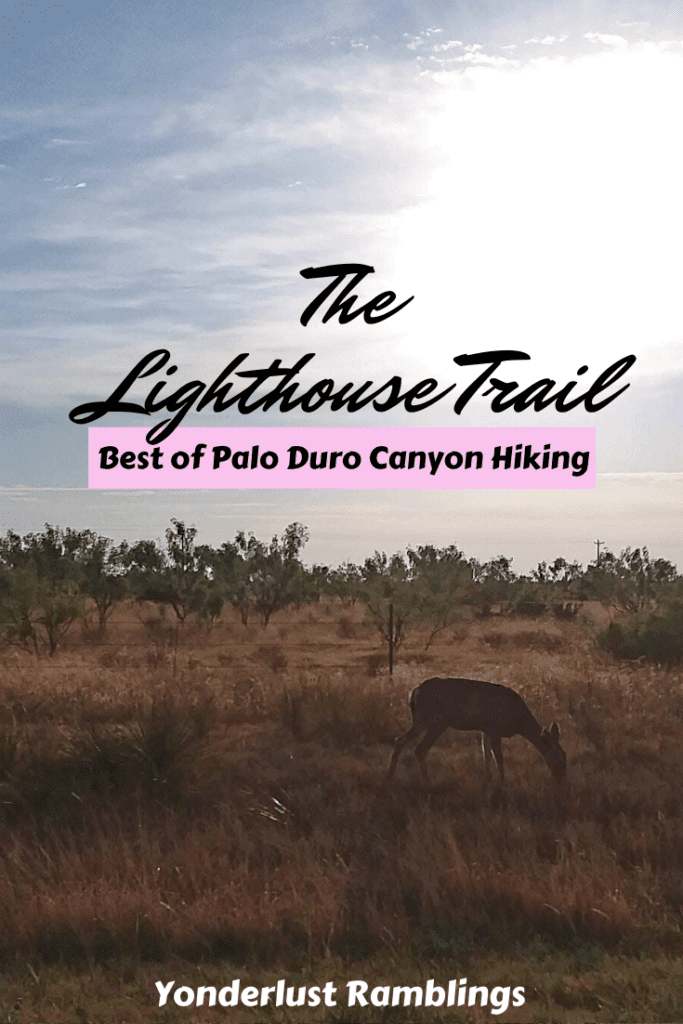
The Best of Palo Duro Canyon State Park Hiking: The Lighthouse Trail
Did you know there are almost 100 state parks in Texas? I would love to think that someday I will have a chance to visit them all, but some of the more under-rated ones reside in the often overlooked nook of West Texas. West Texas gets a bad rap sometimes for being what some might call “flat and boring”, but if you ever have the chance to visit the country’s second largest canyon, Palo Duro Canyon State Park, located just outside of Amarillo, your opinion might just change. There is nothing boring about the myriad of colors you will see on the canyon walls of Palo Duro Canyon trails, and there is nothing flat about the ridges converging towards the sky, or the deep gorges cut into the earth. The best way to enjoy these natural murals is to partake in some Palo Duro Canyon hiking on its most beloved trail gem, the Lighthouse Trail!
Disclosure: Below are some affiliate links-these are all products I highly recommend. I won’t make any recommendations on this page that I haven’t tested or personally used! Enjoy this guide to the best of Palo Duro Canyon hiking – the Lighthouse Trail!
Guide to Hiking the Lighthouse Trail
This trail guide will cover the following information:
- Background on Palo Duro Canyon State Park
- What to Know Before You Go – Location and Logistics
- What to Expect When Hiking the Lighthouse Trail
- Full Trail Report on the Lighthouse Trail
- Gear Recommendations for the Lighthouse Trail
About Palo Duro Canyon State Park
Palo Duro Canyon State Park is endearingly referred to as the Grand Canyon of Texas, because it is indeed the second largest canyon in the United States. Palo Duro Canyon State Park’s hiking opportunities consist of a total of 13 trails, ranging from easy to difficult, from half a mile to almost 8 miles in length.
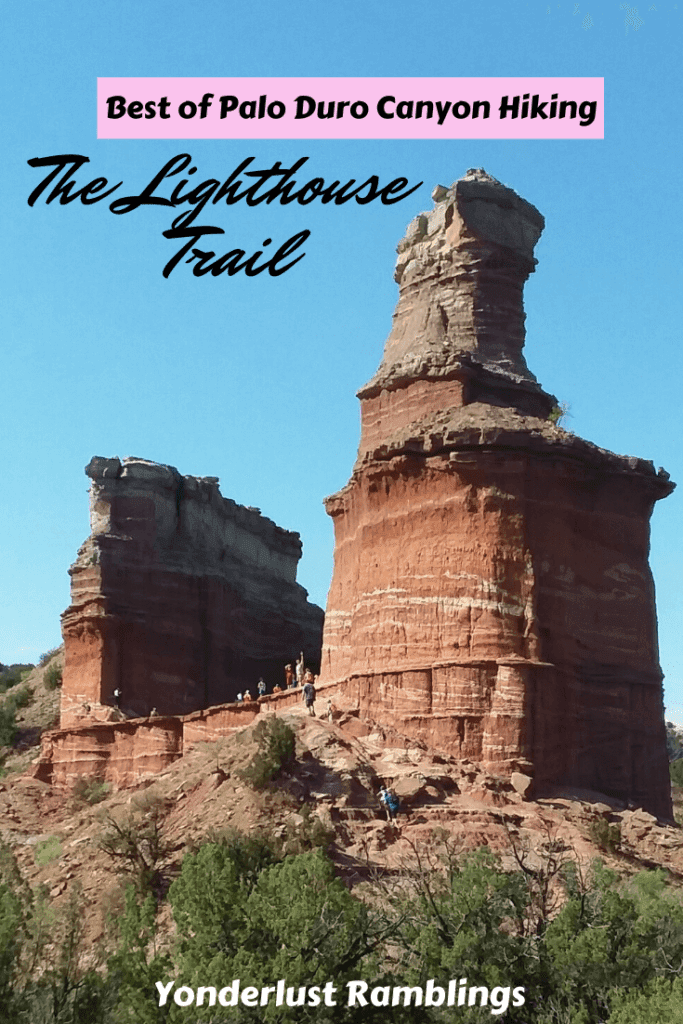
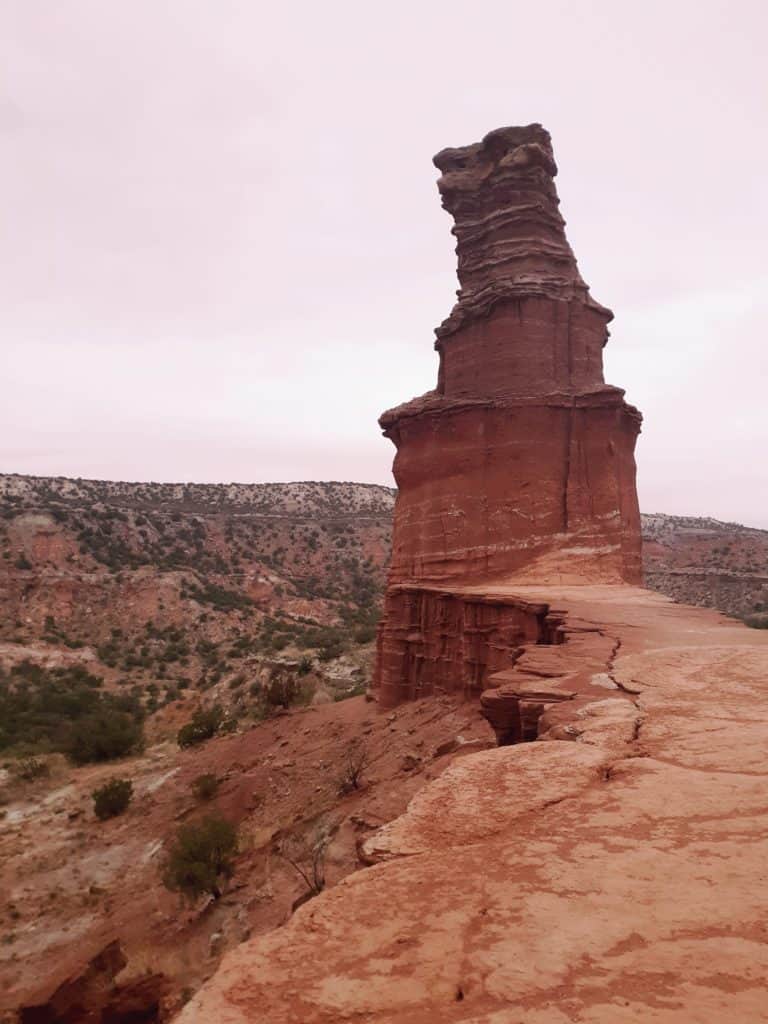
The most popular of Palo Duro Canyon trails is the Lighthouse Trail , named for a striking landmark at the termination of the trail. You can probably guess what it looks like! Like most of my experiences with the best of West Texas hikes, the Lighthouse Trail and the rest of Palo Duro Canyon State Park never disappoint! It is the reason I have come back multiple times to this park and to the Lighthouse specifically!
Map of Palo Duro Canyon State Park and the surrounding area
Quick Facts on Hiking the Lighthouse Trail
Location: Palo Duro Canyon State Park in West Texas. Outside the town of Canyon, Texas. (Google Map)
Length: 5.8 miles roundtrip out and back (if you hike all the way to the top)
Route for the Lighthouse Trail from the parking lot and trailhead to the Lighthouse Rock
Elevation Gain: 521 feet (nearly all at the very end climbing to the Lighthouse Rock)

Difficulty: This is an easy hike, until you climb the Lighthouse Rock. Then it becomes a moderate hike for that one section of incline. Most of the 521 feet of elevation gain occur at once within a few tenths of a mile as you climb to the top of the plateau that houses the Lighthouse. For those that find this incline too challenging, it is possible to admire the Lighthouse from the base.
Dog Friendly: Yes, this hike is leashed dog friendly, but bring lots and lots of water for your furry companion, especially in late spring when the temperatures warm. This trail may start off cool in the morning, but has the potential to warm quickly in shoulder season. I would NOT recommend hiking with pups during the summer months.
Best Time to Hike the Lighthouse Trail: September through May. Winter in West Texas can be brutally cold and windy, with regular strong storms passing through with ice, sleet, and snow. Anytime past May can be brutally hot (I have hiked the Lighthouse Trail at the end of May and if doing so recommend to start very early!), and it is not recommended to hike long distances during the summer months. There is no shade on the Lighthouse Trail, and it is fully exposed to all elements, including sun and wind. If hiking in the summer months, bring extra water and sun protection! If hiking in the winter, bring an outer layer that is fully waterproof and windproof, like this Outdoor Research Helium II Jacket!
Fees: $8 per adult. It is recommended to buy your park day pass in advance on the park website. Camping fees are additional, and campsite reservations can be made HERE.
How Long Does It Take to Hike the Lighthouse Trail? An average of 2-3 hours.
What Gear Do I Need for Hiking the Lighthouse Trail? Below are my Recommended Gear Quick Links, and also a full recommended gear description.
Recommended Gear Quick Links:
- Camelbak Helena 20 Daypack
- HOKA One One Speedgoat Trail Runners
- Hilly Twin Skin Socks
- Icebreaker Merino Wool Base Layer (for colder months)
- Icebreaker Merino Wool Mid Layer (for colder months)
- Columbia Hiking Pants
- Icebreaker Merino Wool Tank Top (for warmer months)
- Platypus Water Hydration Bladder
- Outdoor Research Helium II Lightweight Waterproof Outer Shell Jacket
- This is not an exhaustive list – make sure you have ALL your day hiking gear essentials!
***You can download your own printable day hiking gear essentials checklist HERE!
Full Gear Recommendations Breakdown
Necessary Gear: The most important thing you can bring on this hike is water. I would recommend a hydration bladder, like my Platypus, with a minimum of two liters (three in the summer). This model of Platypus hydration bladder is perfect for on the go hydration, and the wide mouth makes filling, emptying, cleaning, and drying a breeze!
I would also plan to hike with a good pair of trail runners, that can handle patches of loose dirt, rock, and sand, and provide traction on less predictable surfaces. My go to trail runners are HOKA One One Speedgoats, because they have the best cushioning, and great traction. They are lighter than traditional hiking boots, so they keep you moving faster and keep your feet feeling “fresher” on longer hikes.
Pair your hiking footwear with the right hiking socks! Your hiking footwear is only as effective as the socks you pair with it! Blisters are the quickest way to derail a hike. I was very blister prone before I discovered Hilly Twin Skin socks! These socks come with a liner, and that liner deters the friction that can lead to blister development.
You will need a daypack, like my favorite Camelbak Helena 20 pack, that is capable of carrying all the water you need, snacks, and gear. Be sure to check out this guide for all the day hiking gear essentials you will need, for any of your day hikes!
***You can even download your own printable day hiking essentials checklist HERE!
Snacks! Even on a 2 or 3 hour hike, you should plan to bring some snacks. Opt for lightweight, easy to pack and carry, easily digestible, and high on energy snacks! Want to know what snacks I carry on all of my day hikes?
- Sandwich
- Beef Jerky
- Trail Mix / Nuts
- Tuna Packets
- Applesauce Pouches
- Squeezable Peanut Butter
- Honey Stinger Waffles
- GU Energy Gels
- Banana
- Carrots
- RX Bars
- NUUN Tablets / Electrolytes
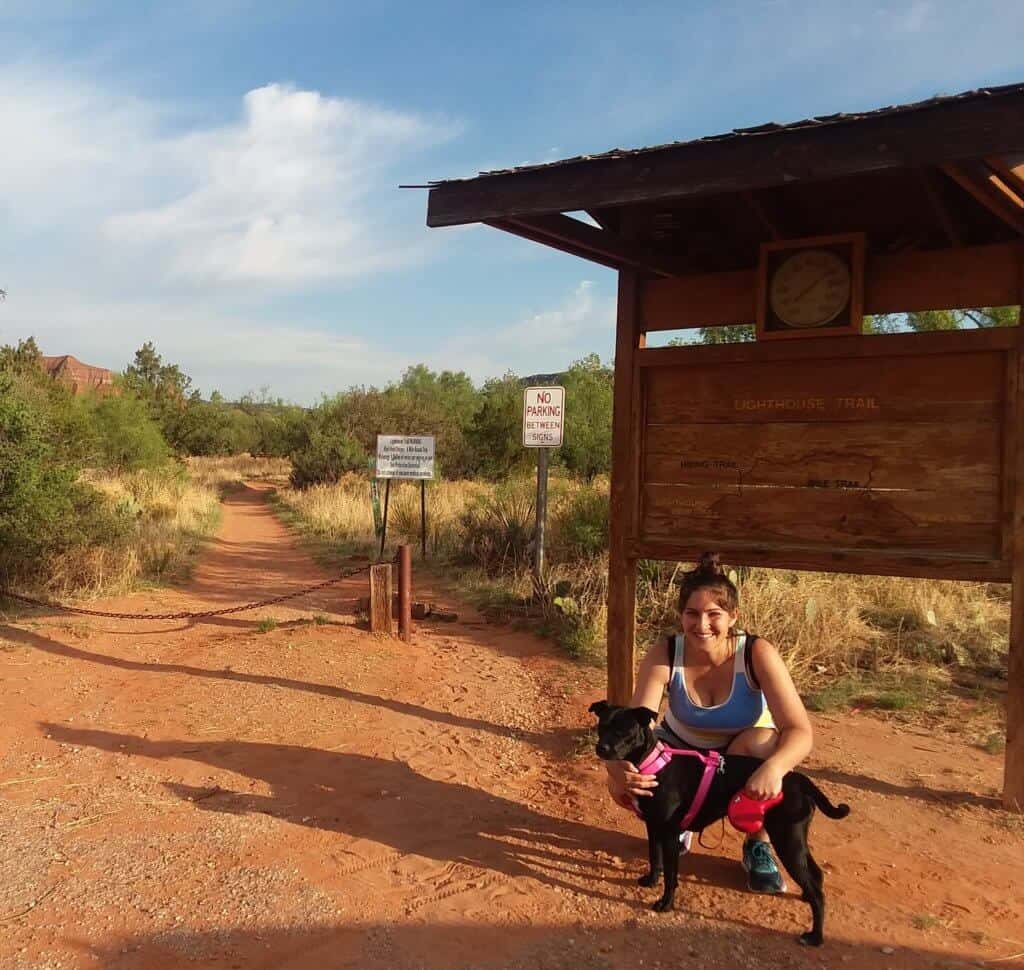 The Lighthouse trailhead
Full Trail Report on the Lighthouse Trail
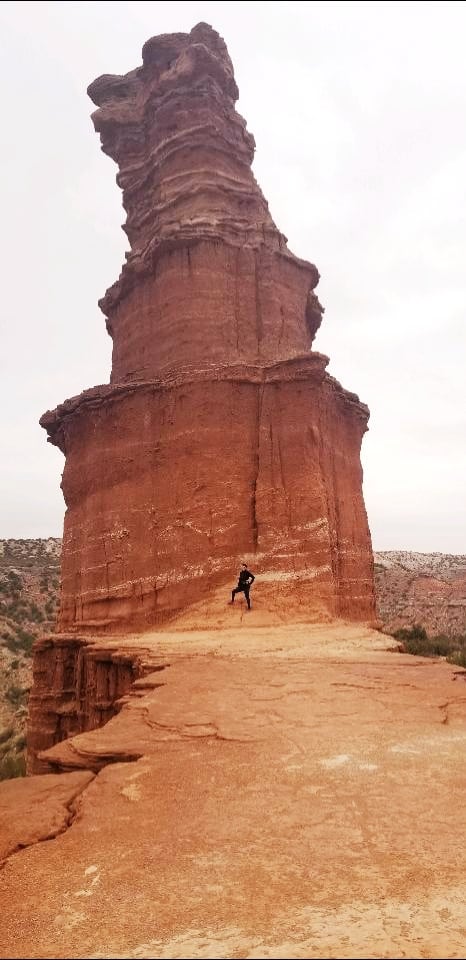
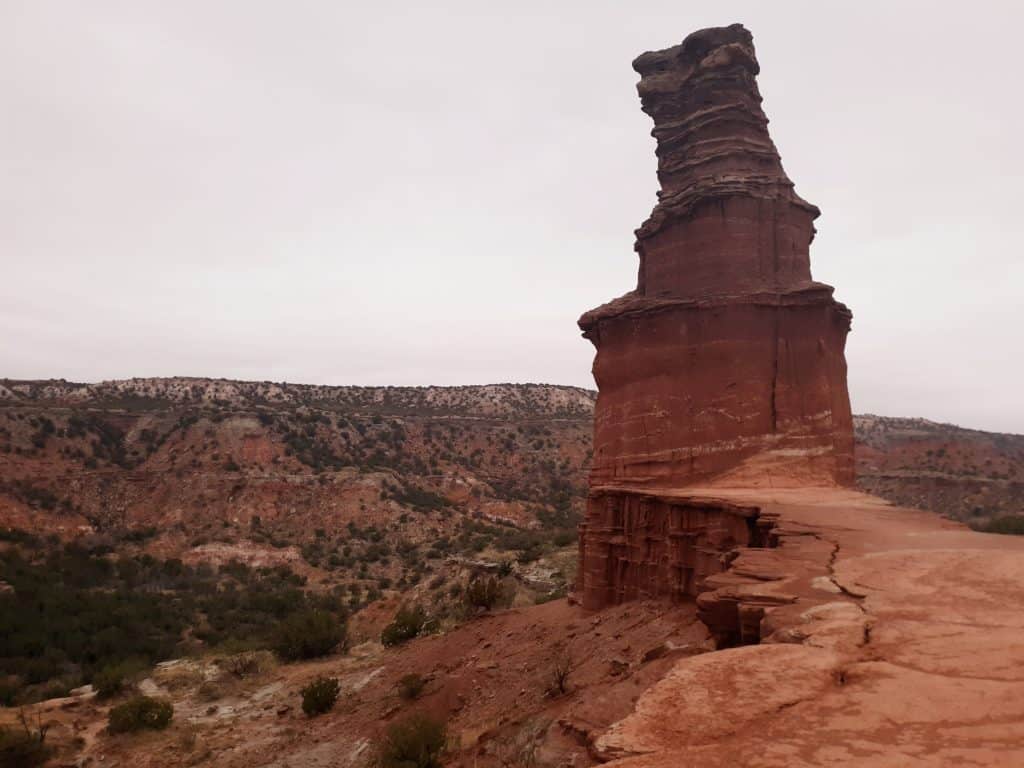
The aptly named Lighthouse Trail gets its moniker from the large red rock pinnacle that juts into the sky at the end of the 2.9 mile hike to its base. The fun thing about this trail is that your destination is in view for a good chunk of the hike. Once you get your first views of the Lighthouse, they will continue to guide you on and provide a little extra motivation as you reach the Rock!
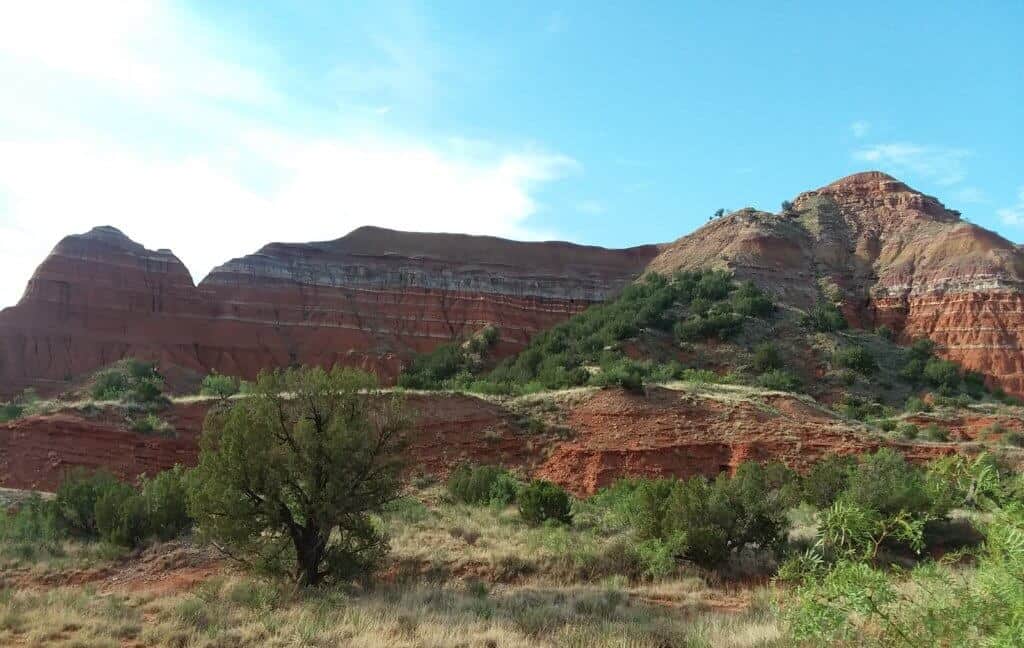
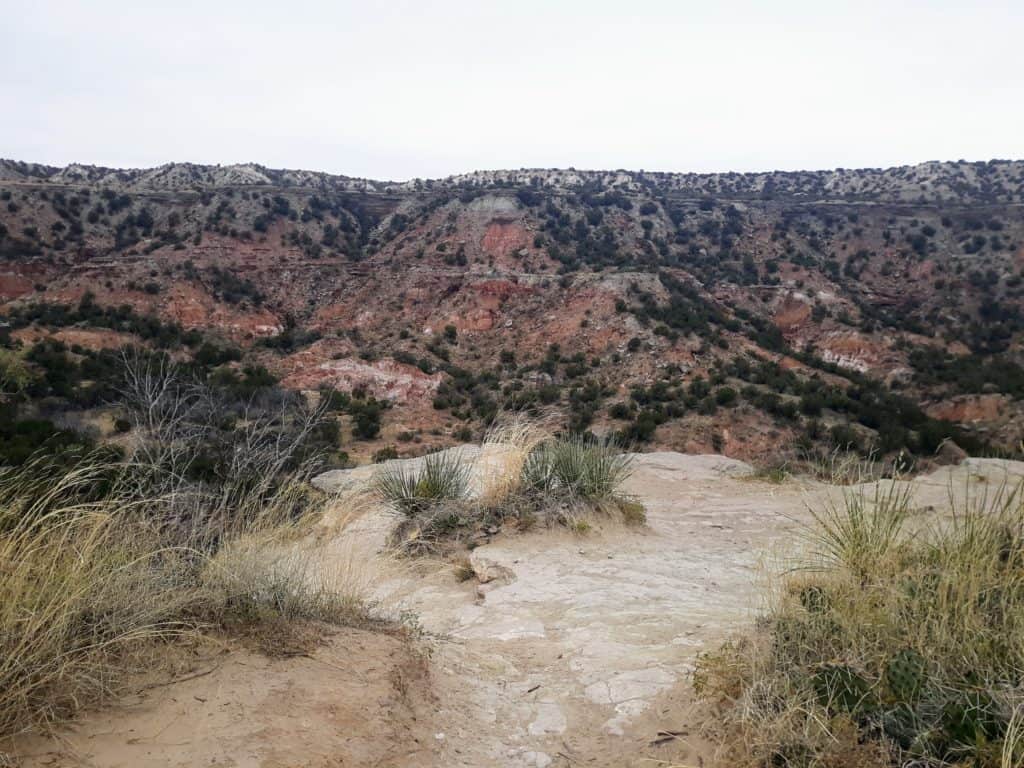
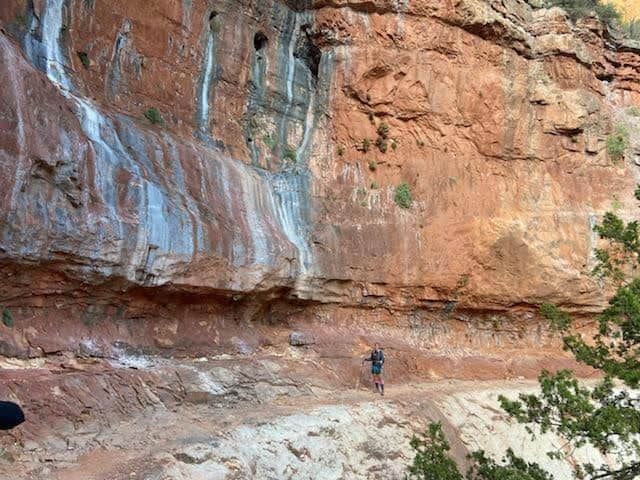
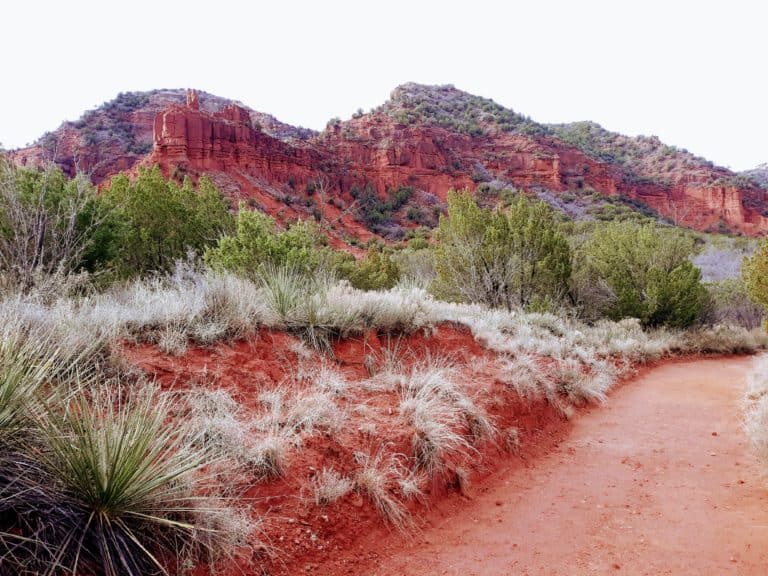
The most stunning part of the hike out to the Lighthouse is definitely the bold reds, oranges, and yellows that paint the sides of the cliff walls and canyon gorges. Every wall has definitive layers of colors, and these different layers just seem to drip down the sides of every rock face present in Palo Duro. With these colors as the backdrop, everything seems to pop more on this trail!


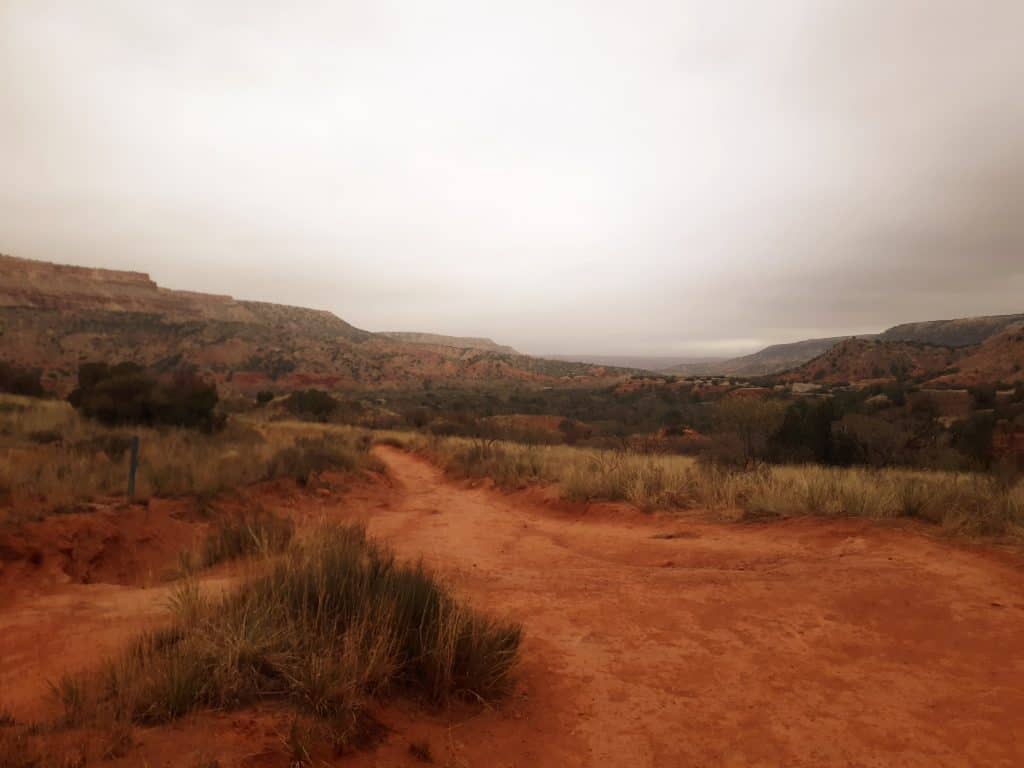
This trail also disproves that “flat and boring” stereotype by providing its hikers with some interesting environmental changes as they hike. The Lighthouse Trail is largely open and brushy, with very little shade, but you will experience the chance to hike through rolling desert plains and open terrain bordered by towering red walls and ledges, then transition to gulches overshadowed by tall, whispering clumps of prairie grass, as you cross several washouts and dried up creek beds winding their way through the park floor. Not only will you enjoy views of the Lighthouse pinnacles, but you will also be treated to the unique desert formation known as the “hoodoo“.
When you reach the turn around point on this out and back trail, the actual Lighthouse Rock, in addition to being able to view the Lighthouse up close, you will also have the chance to partake in the most exhilarating part of this hike, the final climb! There are 2 ways to reach the Lighthouse up close!
- 1.) Continue straight up the main trail which winds steeply up the side of the plateau
- 2.) Veer to the left where there is an “unofficial” bouldering climb through a gulley in the side of the plateau
Option #1: When you reach the small clearing just below the Lighthouse Rock, you will see a picnic table, and a side trail to the left, and a trail continuing straight. You may proceed up either way to reach the Lighthouse Rock, but they are very different trail options.
If you continue straight, you will be on the official trail. This trail is well marked, like the rest of the trail in its entirety, but climbs very steeply for the last portion before reaching the Lighthouse. It comes with epic views as you wind up the side of the plateau.

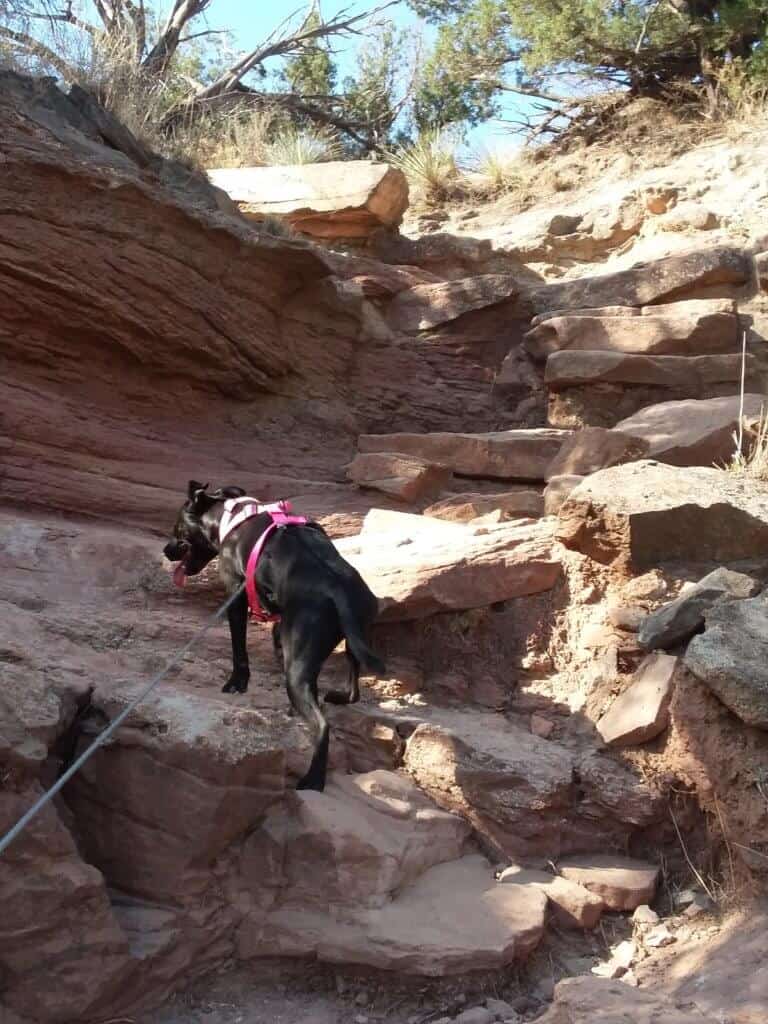
Option #2: The other option veers off the “official” trail at the clearing with the picnic table. You can find this optional trail on the left of the clearing and picnic table area. It is unmarked. It appears as nothing more than a washout gulch filled with boulders, but you can scramble up these boulders to reach the base of the Lighthouse Rock. It is not an easy scramble, and involves some hand over hand and heaving, but it is a fun way to reach the Lighthouse for those that are up for it! It will take approximately 5-10 minutes to approach the Lighthouse from this option.
***Note: I did bring my dog up the bouldering route on one of my hikes to the Lighthouse, but only because I knew she had the strength and agility to be able to handle the climb. Take precaution if you are unsure if your dog can handle the scramble and climbing over the rock, and play it safe if necessary and proceed up the well maintained dirt path on the official trail to the Lighthouse.
With either option, this is the only part of the hike that will provide any significant elevation gain, but it is a chance to get your heart pumping whether you choose to do some rock climbing up a steep, narrow gorge for the final five or ten minutes, or hike up the steep incline with killer panoramic views! With either choice, you will be rewarded with your first up close views of The Lighthouse from its base!
The bridge providing this natural “bridge walkway” between the pinnacles has some pretty impressive drop offs, and even more impressive panoramic views! Definitely take a few minutes to gaze up at the Lighthouse, rest in the shade of the spires, and explore around the rocks. Nothing beats a water and snack break here in the shadow of some of nature’s most impressive “skyscrapers”, assuming the wind is not too strong or cold!
***Note: as mentioned, there are steep dropoffs located along this natural “bridge”, and depending on the season, that could be coupled with very strong winds. Be extremely cautious and mindful when bringing young children or pets up on Lighthouse Rock!

Recommendations for Hiking the Lighthouse Trail
Here’s a quick synopsis of my top recommendations for hiking the Lighthouse Trail and any of the Palo Duro Canyon hiking trails:
#1: Protect from the Environment
#2: Bring Plenty of Water
#3: Bring Trusty Trail Runners and Other Gear
#4: Wear Breathable, Moisture Wicking Clothes
#5: Bring Good Hiking Snacks
#6: Get Your Day Pass Online, Arrive Early, and Hike Early
A few pointers and recommendation for the Lighthouse Trail – the most important thing is to prepare for the environmental elements: sun and heat exposure in the warmer months, and wind and cold in the colder months! There is very little shade on this trail, and although it is not a physically strenuous hike, the most challenging part during the warmer months is dealing with the summertime environmental factors! Bring PLENTY of water (minimum 3 liters), sun protection in the form of sunscreen and Chapstick, and a head covering.
The same can be said during the colder months. There is very little protection from the winter elements like cold and strong winds. West Texas in general is notorious for its strong wind. Bring protection in the form of Chapstick, a head covering, warm, breathable, moisture wicking layers like fleece or wool, and a good waterproof and windproof outer shell, like this ultralightweight Outdoor Research Helium II waterproof and windproof jacket! Check out this guide that covers everything you need to know to safely and comfortably hike in winter. In addition to these items targeted at the environmental factors, you will want to bring the rest of your day hiking gear essentials in a suitable daypack, like this Camelbak Helena 20 daypack.
***Download your own printable day hiking gear essentials checklist HERE!
A minimum of 3 liters per person, especially in the warmer months (and including any animals) would be my recommendation. I have always hiked with 3 liters of water in my own Platypus water hydration bladder.
Looking for a easy to carry, collapsible dog bowl? Check out the one I use for my Middy pup here on Amazon. If you are bringing your pet in the warmer months, and they they have dark fur like mine, you may want to bring even more as they will probably appreciate being cooled down by little baths here and there (I know my pup did).
Besides water, what other gear do you need for this hike? Sun protection, in the form of sunscreen and head coverings. A trusted trail runner, like my HOKA One One Speedgoats trail runners. HOKA’s are highly reputable and trustworthy in the trail running and hiking worlds, and they are my go to’s for any kind of hike or trail run. I would say a hiking boot is not absolutely necessary on this trail, and a good trail runner shoe would suffice. Make sure that you pair your hiking footwear with an equally high performing hiking sock, like these Hilly Twin Skin socks!
And finally, good, breathable, moisture wicking, clothing to hike in. I personally love the IceBreaker brand, because they utilize Merino wool in all their clothing items. in the summer, I love hiking in this IceBreaker tank top! As this is a shrubby, sometimes scratchy environment, I choose to hike in these Columbia hiking pants, which are both durable yet very breathable! In the winter, I like to layer with Icebreaker wool base layers and wool mid layers. And I always top my layers off with the best outer layer shell out there, the ultralightweight and waterproof Outdoor Research Helium II Jacket!
And bring snacks, because even though it will not seem like you are physically exerting yourself on this trail, you will need to replenish your energy after the climb up to the Lighthouse, as well as replenish any nutrients you are bound to lose through sweating it out on this trail. Snacks and food should be easily digestible, lightweight and easy to pack and carry, and high energy. A few of my favorite hiking snacks are applesauce pouches, beef jerky, tuna packets, trail mix or mixed nuts, squeezable peanut butter packets, and GU energy gel packets.
Check out my complete list of the best hiking snacks HERE!
What should you pack your snacks (and water) in? How about this comfy Camelback Helena 20 Liter daypack? And don’t forget to include all of your day hiking essentials in that daypack! Once again, make sure that you don’t forget any of your own day hiking gear essentials, for the Lighthouse Trail, or any other day hike you go on, by downloading your own handy day hiking essentials checklist HERE!
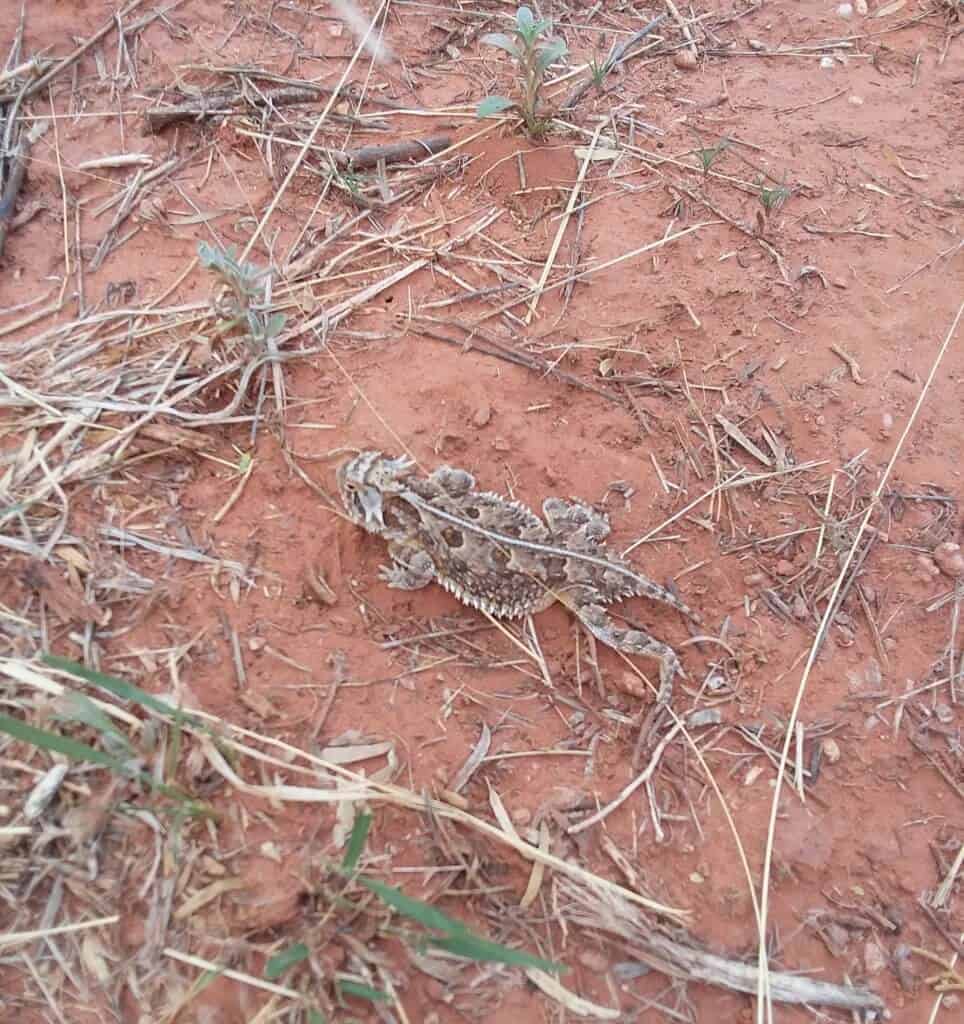
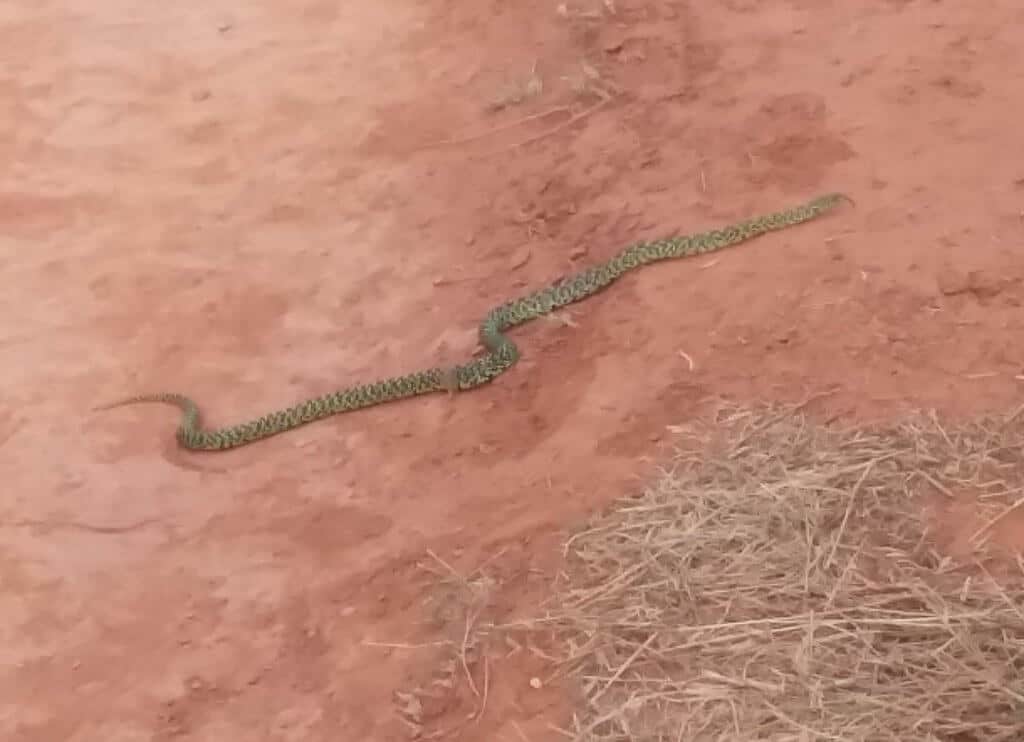
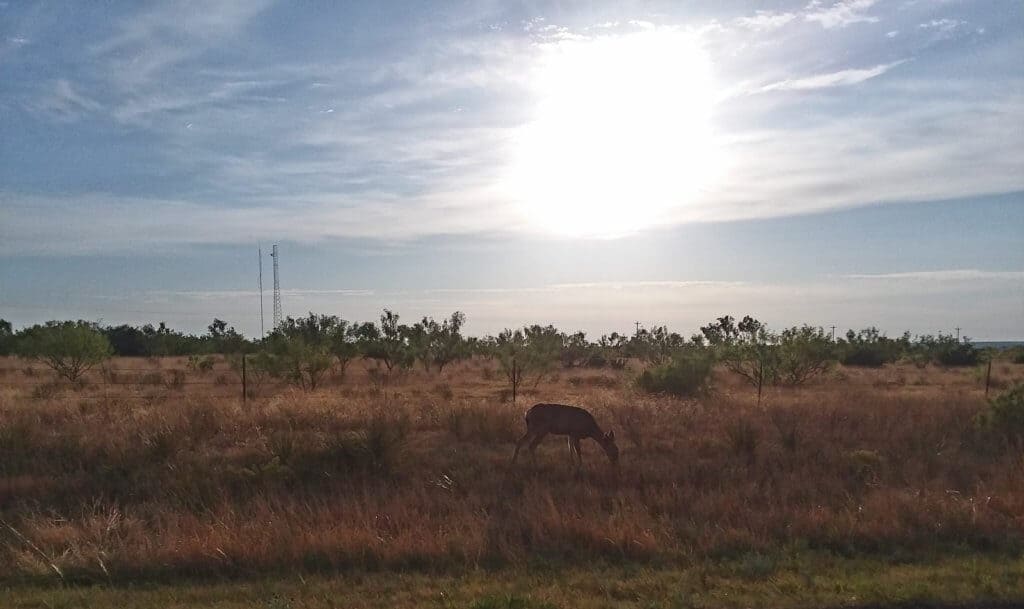
My final bit of advice would be to start as soon as the park opens at 7 am, as this trail does get more trafficked due to its popularity. You may be lucky enough to be treated to a glimpse of native wildlife like I have been, including a young horned toad, a beautifully speckled king snake, and some resident deer, though I doubt these guys hang around out in the open much past the early morning. So if you want a chance to see them, and beat the crowds, then arrive early! And reserve your park day passes in advance!
I hope this post will encourage you not only to go visit your amazing state parks, no matter where you reside, but to also give this canyon, the second largest canyon in the United States, and its most famous of Palo Duro Canyon trails a shot! It may be the little sibling to the Grand Canyon, but it has just as much to explore, appreciate, and discover!
Read More: Besides my experience with Palo Duro Canyon State Park hiking, wanna know where some of my other favorite little nooks of West Texas are? Check out a few of my other favorite active travel destinations in West Texas, including:
- the Monahans Sand Dunes,
- El Paso and the Franklin Mountains,
- neighboring Caprock Canyons State Park,
- Santa Elena Canyon in Big Bend National Park
- the OTHER top canyons in all of Texas,
- Guadalupe Peak and the Guadalupe Mountains
- the best mountains in Texas
***Whether you are enjoying active travel alone or in a group, always ensure proper safety with these hiking tips, including solo hiking safety!
Have more Texas State Park Hikes Planned?
PIN for LATER!


Palo Duro Canyon has its own unique beauty exhibiting every shade of red against the backdrop of a west Texas blue sky! It is definitely worth it to go all the way to the top of the Lighthouse trail! Great advise to go early, bring plenty of water and snacks!
We love Palo Duro Canyon so much! Definitely a hidden gem in Texas and with Lighthouse Trail to GSL has to be one of our favorite parts in the park!