The Boundary Peak Hike: the Highest Point in Nevada
The Boundary Peak hike is a formidable trek in the world of U.S. state high point hikes. Much like the surrounding region, the Boundary Peak hike is desolate, rough, and forlorn, but also rich, stunning, and rewarding! The Boundary Peak Trail, which leads to the highest point in Nevada, is surrounded by miles of empty desert, which is somehow transformed into a beautiful landscape by the jagged hewn, stark white peaks of the White Mountains. Not only is there an oddly mesmerizing beauty to this barren and imposing wilderness, but it is home to a humble and fascinating history of mining and old west settlements. Small towns like Benton, California and Tonopah, Nevada, some of the closest “bases” to Boundary Peak, have on full display the early west life of these old mining establishments. For a fully immersive experience in both hiking, secluded wilderness, and a flashback in history, take on the impressive Boundary Peak hike, the highest point in Nevada!

Disclosure: Below are some affiliate links-these are all products I highly recommend. I won’t make any recommendations on this page that I haven’t tested or personally used! Enjoy this guide to the Boundary Peak hike!
Table of Contents
Guide to the Boundary Peak Hike
Boundary Peak was #43 out of 50 U.S. state high points for me. It may not rank high in the arena of famous alpine summits or win any 13’er or 14’er trophies, but it is a formidable giant if you are attempting to hike all 50 state high points. For many “highpointers” this is considered one of the top 10 toughest ones. With the Boundary Peak Trail, however, it is not just about physical stamina, but also mental toughness and heightened mountain awareness. The Boundary Peak hike is brutally honest in terms of seclusion and isolation, and a highly respectable opponent in high altitude skill sets. If you are thinking of attempting Boundary Peak, make sure to get familiar with all aspects of it first.

Location of the Highest Point in Nevada
Boundary Peak is located in the White Mountains range, in far western Nevada. In fact, the summit of Boundary Peak is a stone’s throw away from its neighbor Montgomery Peak, which is actually located in California, and ironically, a tad bit taller! There’s not much around Boundary Peak with the exception of a handful of small old west towns like Benton, California and Tonopah, Nevada. The closest city of decent size is Bishop, California. There is a charming Inn at Benton Springs in Benton, very close to the Queen Mine Trailhead, which is where I chose to base out of on my Boundary Peak hike. You can locate the Queen Mine Trailhead on Google Maps.
**** There are two trails to the summit of Boundary Peak in Nevada – the Queen’s Mine Trail, and Trail Canyon . This post will discuss hiking Boundary Peak solely from the Queen’s Mine Trail route perspective, though there are pros and cons to each route in.
Map of the region surrounding the highest point in Nevada


Quick Facts on the Boundary Peak Trail
Length: 8 miles ( plus a couple extra miles if you are not able to drive all the way to the trailhead at Kennedy Saddle ).
Elevation: 13,147 feet
Elevation Gain: 3,543 feet

Boundary Peak Via the Queen Canyon Trail Elevation Chart
Rating: Difficult
Dog Friendly: wouldn’t recommend it
Best Time to Hike the Boundary Peak Trail: Late spring, Summer, or early Fall – Shoulder seasons of spring and fall are best, if you can work around snow, and summer is also doable if you start early to beat the afternoon heat! There is no shade or water sources on the Boundary Peak hike, so again, if you choose to hike this trail in the summer, be prepared for hiking in a desert environment, and start very early!
Estimated Time to Hike: the official trail is 8 miles out and back roundtrip, and the estimated time to hike is 5 – 7 hours. However, if you do not drive in to the actual trailhead, and instead pull over and park below, you will be adding additional mileage to your hike, and will have to count on a longer estimated time to hike.

Boundary Peak Trail Report
Where do I start with Boundary Peak? To be honest, this trail caused me a decent amount of stress going into it, which prevented it from being one of my favorite high point hikes. However, it is an oddly mesmerizing and highly under-rated hiking destination, and many aspects of the Boundary Peak Trail will blow you away as it did me. But, there are a handful of unpredictable factors that go along with hiking Boundary Peak, and for that reason, it’s definitely not a fun “breeze” of a hike. It requires full and harmonious functioning between your physical and mental game.

Getting to the Trailhead of the Boundary Peak Hike
So far to date, I have not met as formidable a drive in as I did on Boundary Peak, via the Queen’s Canyon Road to the trailhead. After reading this it may become obvious that I don’t have a large wealth of off-roading or 4WD experience, but I’ve done a bit and seen a bit, and still nothing compares to the drive in. I poured over literally hundreds of reviews and trail reports on driving in and up to Boundary Peak and its trailhead, and you can find opinions that run the gamut between “don’t attempt it at all in any vehicle whatsoever” to “you can make it up in anything, no problem”.
Just for background, I’ve driven up some rough roads. I don’t shy away from a bit of a challenge. I own a SUV, though it is not 4WD, and that is what I drove to Boundary Peak in.
So here’s the thing. There are actually two trails that lead to Boundary Peak. Trail Canyon approaches Boundary Peak from the Nevada side. I cannot personally attest, but rumor and reports from others have it that this drive in is much more maintained and significantly more passable However, the Trail Canyon Trail to the Boundary Peak summit is also rumored to be a bit more challenging, and is longer in length. So it is really up to you to pick your poison.
That being said, this post addresses the other route called the Queen Canyon Trail. And perhaps the most notorious reputation of reaching the highest point in Nevada, is the road to the trailhead itself on the Queen Canyon Road.
To get to the Boundary Peak Trail via Queen Canyon, you must first drive along Highway 6. There is a small, unmarked dirt road that branches right off the highway, but Google Maps will direct you correctly onto it if you just put in “Boundary Peak Trailhead”, or “Queen Canyon Trailhead”. I would highly recommend putting something into a GPS beforehand, as the road off of Highway 6 would be super easy to miss, and honestly just looks like a dirt farm road at first glance.
After turning off of Highway 6 on to the Queen Canyon Road (the aforementioned dirt road), you will have about 6 miles to drive before reaching the actual trailhead for the Boundary Peak hike, sitting atop Kennedy Saddle. And here’s where it immediately gets interesting, and you will have to turn your awareness radar up all the way. Especially, especially if you are doing this hike solo, like I did, and if your vehicle is less than fully off-roading worthy.
The first 4 miles is rough, but slow down and anyone in any car can do it. You may have to take up the whole road to go around a few potholes and such, but it’s not exactly a high traffic area most of the time. If the brush on the side is overgrown, there’s a possibility of getting some scratches on your vehicle from over-reaching branches. I personally did not, but have read plenty of that happening to others.
The last 2 miles or so of the 6 mile drive to the trailhead gets really dicey, and this is where it really, really, really helps to have a high clearance AND 4WD vehicle. The question that everyone inevitably asks and wants to know is do you HAVE to have a high clearance 4WD vehicle for the last 2 miles? My honest answer would have to be YES, I do feel it is a necessity. There is always the possibility that one person in 100 could make it up to the trailhead in a mini van, but I think the risk of becoming immobile in a remote desert without cell service far outweighs the risk of deciding ahead of time that you are just going to have to walk in a few extra miles. That is what I did. Tow trucks aren’t exactly able to quickly and easily come rescue you on this one! And there is very little other foot traffic at Boundary Peak, so waiting on someone else to rescue you is also not a reliable plan.
Keep in mind that the further in you go, the narrower the road becomes, and there are fewer and fewer spots to be able to “turn around”, if you realize too late that you can’t make it up.
So here’s my simple, straightforward, and honest recommendation: if you do NOT have a high clearance and 4WD vehicle, you need to plan to pull over in a spot and plan to add an extra couple miles to your overall hike. There are several smaller and larger clearings before those last 2-ish miles. If you DO have a high clearance vehicle with 4WD, you can make it up. I personally saw a truck and SUV make it up the same day I was there. But I wouldn’t recommend the Queen Canyon Road up to Boundary Peak be your first 4WD experience. Have a little practice under your belt. If you don’t have that prior experience and practice, then I would probably stick with my first recommendation and just add an extra hour or two to your hike.
If you are driving all the way up to the trailhead, there are a few “landmarks” to watch for. The first is the abandoned Queen Mine on the left hand side driving up. It rests in the side of the mountain overlooking a large clearing off the side of the road. If you want to really play it safe, you can pull over and park here.
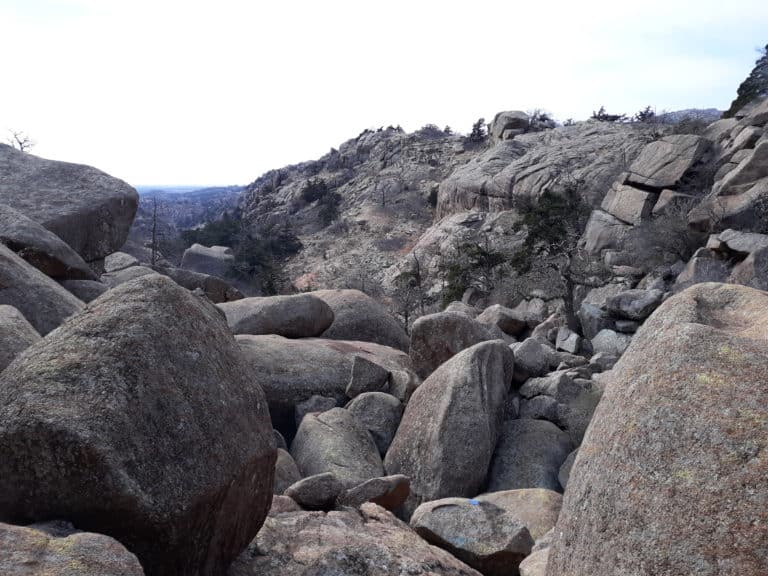
Next is the Kennedy Saddle, a little further up past the Queen Mine. The Kennedy Saddle is the final destination for those who are driving all the way to the trailhead, and it is where you should park in its clearing. The views from Kennedy Saddle are already fantastic, and provide great views of both sides of the mountain range!


 Looking back at the Queens Mine Road in from Kennedy Saddle
Starting the Boundary Peak Hike
However you get there, the official trailhead for the Boundary Peak hike is a brief jaunt up from Kennedy Saddle. There is a small register, but at the time of my hike it was empty.
If I were to sum up the Boundary Peak hike in one sentence, from a technical perspective, I would describe it as one tough but brief initial spurt uphill from the official trailhead (about 1 mile and a hair less than 1,000 feet in gain), a beautifully flat and gorgeous middle saddle (about a mile and a half), and then two “humps” (about another mile and a half and closer to 1,500 feet elevation gain per mile average) that will really test you on your way to the summit.
From the small register at the trailhead, the trail climbs almost immediately. The grade is aggressive, but relatively short in length. It’s about a mile long climb at just under 1,000 feet elevation gain. It’s a good warm up for what’s coming. On the right hand side of the trail up this first ascent is a small grove of pines, gnarled and weathered from the high elevation elements, and adding their own unique touch to this desolate environment. Along with the ancient pines, you may also start to see small herds of deer and tiny wildflowers somehow clinging to life here, adding their own touch to Boundary Peak’s tapestry.


After the initial ascent, the trail suddenly opens up onto a gloriously flat saddle. The trail runs the entire ridge of this saddle, extending out in front for about a mile and a half. It is not often on such challenging mountain hikes that you find such a lovely, nearly flat, and relatively lengthy section of ease. Enjoy it, because the hardest part comes next. At this point, Boundary Peak’s summit is beginning to loom over you from the left hand side of the trail.


After the breezy middle portion of the Boundary Peak hike, get ready to make up for it. There is a perfectly positioned tree stump and large rock slab that rests poignantly at the base of the next uphill push, and it is a good place to stop for a break and refuel if necessary.
From that rock slab, you will be facing a brutally tough climb up two “humps”, full of scree, gravel, unpredictable rocks, and difficult trail finding. Looking up at the trail, or looking back on it from higher up, it’s often easier to see the trail itself, but when you are knee deep in rocks and scree looking at the next couple of feet of trail, it can become extremely difficult to keep your correct route. This is where that awareness I talked about earlier really comes into play.

These two “humps” are serious uphill pushes. Both are scree covered, both are unpredictable, and both are prone to causing slips and slides. These humps last about a mile and a half together, and add up to about 2,000 feet in elevation gain. You’ll probably feel pretty confident heading up the first ridge, because the trail starts out pretty visible. About halfway up, however, it starts to become more tricky to find. You need to go slow, stop often, and take in your surroundings, look back, and look forward. I even used my Black Diamond trekking poles to scratch markings in the scree and gravel trail, so that coming back down I could more easily guide myself, if I got to a spot I was experiencing some self doubt with my route finding skills. Aside from making “chicken scratches” in the dirt and gravel, trekking poles were extremely helpful for this last section, because it gave me much more stability in very unstable surroundings.
The important thing is to take your time, have slow, careful, and intentional foot placement, use trekking poles for extra stability if you have them, and pay attention to your location, especially relative to the trail. If you are using an app like AllTrails, reference it as often as you can to help keep you on track.

After reaching the top of the first “hump” or ridge, you then have to traverse over the second one to reach the summit of Boundary Peak. The “spine” separating these two peaks must be carefully crossed. There is a trail that runs a little below the actual “spine” of this ridge, but I myself, and several other reports I read prior, recommended just sticking as close to the spine as you can. The scree slippage is lessened by traversing this ridge as high up on the spine as you can. The good thing about Boundary Peak is, you can see where you are headed the whole time. The end goal will always be in sight, after you scramble over the imposing rocks, of course.
After making it across these two scree covered “humps”, you’ll be ready to push for the summit. This last portion includes a bit more substantial and aforementioned scrambling over some larger rocks, but nothing technical, and no specialized equipment is necessary. A pair of gloves may come in handy here for your own comfort level. Once you reach the summit, enjoy those well earned views from the top of the White Mountains and the highest point in Nevada!


To return, descend the same way you came. Take extra care going down the scree covered slopes. They are just as treacherous coming down as they are going up, if not more so. Once you reach the rock slab at the bottom of the slope, you are almost home free. Enjoy that breezy middle stretch again, and then a quick downhill back to the Kennedy Saddle!

Recommended Gear for the Boundary Peak Hike
You definitely do not want to “wing” the Boundary Peak hike. Come prepared with the essentials. This is a very isolated trail, so being responsible and prepared is critical.
Footwear – with the instability of the last push up the scree fields, many hikers of the Boundary Peak Trail have gone with a traditional hiking boot for the support and stability. I myself alternate between my go to waterproof Vasque hiking boot, and my own pair of the best trail runners – Hoka Speedgoats. I can see a case for both, though I personally hiked the Boundary Peak Trail in my Hoka Speedgoat trail runners. For me, a solid trailrunner like the Speedgoats offer uncompromised cushion and unbeatable grip much like a hiking boot, but they are a little more “liberating” in the weight category, meaning I feel like I am able to maintain a quicker pace and my feet ultimately feel “fresher” and “lighter” over long distances. But like I said, there is definitely a case for either choice. Just make sure that whatever you do, you are wearing something with a good gripping sole that is trustworthy on shifting scree, especially scree that has the potential to be slick at times.
Socks – taking care of your feet requires more than just what shoes you wear. A good pair of shoes can be totally worthless if you don’t also invest in a good pair of socks. Breathable and moisture wicking is the best way to avoid blisters. I myself struggled with blisters on hikes and trail runs over long distances, until I discovered a brand of active wear socks that revolutionized my own active lifestyle. Hilly Twin Skin socks are lined, and that inner lining works its magic by reducing friction, and therefore reducing blisters. I have not encountered a single blister since switching to Hilly Twin Skin socks years ago – not on the grueling all day long Rim to Rim hike or the iconic 22 mile Mt. Whitney hike, the highest of high points in the contiguous United States!
Trekking Poles – there are parts of the Boundary Peak hike that will not require trekking poles (the gentle, flatter, middle section) and then there are some parts that they will help save you and your knees (the last part to the summit over the scree fields). I can’t say enough good things about Black Diamond trekking poles with the cork handles. They are sturdy and reliable, and the cork handles help keep sweaty palms from slipping, like they would on other surfaces like rubber. Just make sure that your day pack has the capacity to store trekking poles on the parts that you don’t need to actively be using them.
Water Hydration System – this is a big one, because you are in the desert! An extremely isolated, low trafficked, completely exposed, desolate patch of Nevada desert! There are no reliable water sources on the Boundary Peak Trail. Start your hike with what you need for a long day hike in the desert. There is no shade on the Boundary Peak Trail either, so that is why water is so important. I would recommend hiking with no less than 3 liters! I personally hiked with 5. To make sure that you are hiking with adequate water, I would invest in a water hydration transportation system like Platypus’s wide – mouthed 3 liter hydration bladder. This is the bladder I use for all long day hikes, and I particularly like this model because the wide mouth is easy to fill, easy to clean, and easy to dry. Hydration bladders allow me to have access to on the go hydration. On Boundary Peak, just to make sure that I had extra water, I also carried an extra 2 liters of water in handy Nalgene water bottles. Yes, it made my pack heavier, but that was worth it to me to not have to worry about water supply on a lonely desert peak.
Day Pack – you’re gonna wanna hike with a “handful” of stuff for the Boundary Peak hike, so make sure that you have a day pack suitable for an all day hike. I really love Camelbak’s Helena 20 liter pack. It is water hydration bladder equipped, can store trekking poles on the sides, and has just enough space and pockets to cover all my day hiking essentials.
***Download your own Day Hiking Gear Essentials Checklist HERE!
Emergency Gear – I’ve learned the hard way that certain life lessons can present themselves more on lonely, isolated, and remote hikes (see Utah’s Kings Peak for the full story)! Nowadays, I trust in the abilities I’ve been given, but I don’t take for granted the need for emergency gear, no matter what! There’s a strong case to pack along emergency gear for the Boundary Peak hike. If something should go wrong, there’s a good possibility you are the only one on the mountain that day. Or best case, there may be a couple others all day. There are no rangers patrolling, you are miles away from civilization, there are no reliable water sources on the peak, and Boundary Peak is notoriously a little sketchy (slips and falls are not unheard of). It is highly recommended to hike with an emergency back up plan that includes: more water than you think you’ll need, emergency shelter, emergency signaling devices, emergency medical care, and food and backup food. On top of that, be sure to bring certain layers, even if it is the dead of summer. The most important layer you can bring is a fully waterproof, windproof outer layer.
****check out this post on all your day hiking essentials, which includes everything you need for Emergency Gear!
Outer layer – layers are important on Boundary Peak, because the weather can change from the base to the summit, even in summer. Also, as is true with most mountain peaks, summit weather can be unpredictable and prone to storms. Even if the forecast from the ground doesn’t mention precipitation, bring a fully waterproof and windproof outer layer along for the Boundary Peak hike. I myself saw a boisterous storm form on the summit at 11 am on a summer day that didn’t call for anything! It is challenging to find a fully waterproof and windproof outer layer that isn’t super bulky, restrictive, or non-compactable, but I am convinced that the best deal out there is Outdoor Research’s Helium II jacket! This amazing outer shell layer is everything – extremely lightweight (like literally a couple ounces), extremely compressible and compactable, and best of all, fully waterproof and windproof. Underneath your outer shell, make sure to layer properly with appropriate breathable, moisture wicking fabrics, like fleece or wool, and avoid cotton!
Snacks – your snacks for the Boundary Peak hike should consist of high energy foods that are easily digestible, compact, and lightweight. Some of my favorites are applesauce pouches, beef jerky sticks, trail mix or mixed nuts, protein bars, and tuna packets. And it never hurts to throw in a peanut butter and jelly sandwich or such if you feel like you may want to take an extended lunch break after coming down off the summit. Whatever you choose to snack on for fuel, make sure that you have “tested” out your hiking food regimen. Don’t eat something, no matter how hyped it might be, for the very first time the morning of your Boundary Peak hike. Make sure you know it is something that will settle and sit well with you on your hike. This is tried and true advice for any big physical exertion, from grueling day hikes to the morning of a half marathon or marathon run!
Here’s some Quick Links to some of my favorite day hiking snacks:
- Sandwich
- Beef Jerky
- Trail Mix / Nuts
- Tuna Packets
- Applesauce Pouches
- Squeezable Peanut Butter
- Honey Stinger Waffles
- GU Energy Gels
- Banana – for cramping
- Carrots
- RX Bars
- NUUN Tablets / Electrolytes

***Curious about other state high point hikes?
Get to know all 50 state high points in the U.S. here!
***And don’t miss out on grabbing your 50 state high points of the U.S. download!
PIN for LATER!